Before & after
Explore published cases. Results vary; missing treatment or photography details are not assumed.
Individual results may vary.
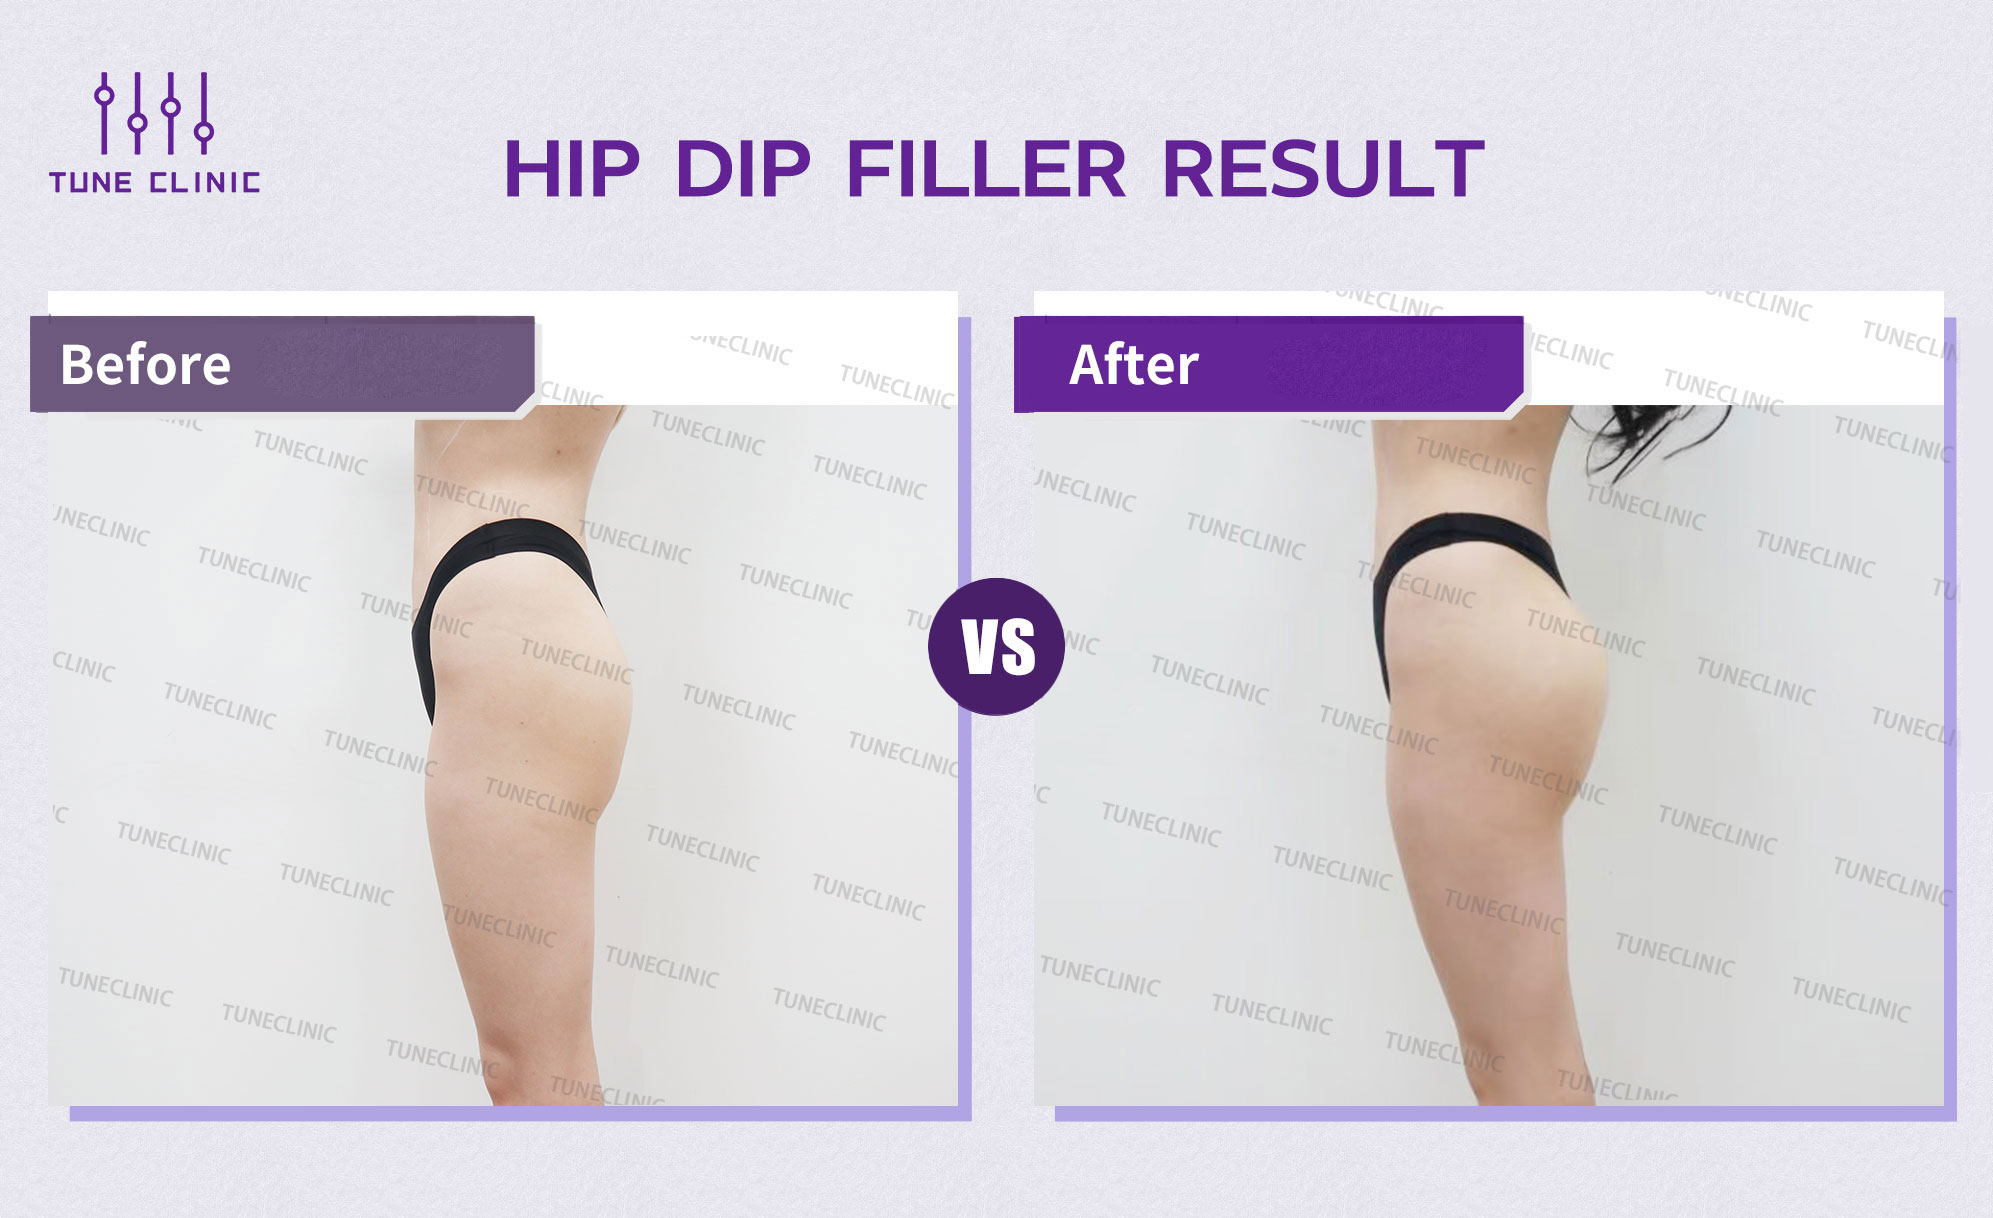
Body Contour
Hip Dip Correction
Targeted volume restoration to smooth the hip silhouette naturally.
Clinical reference only. Individual results vary. Not a guarantee of outcome.
View Details
- Timeframe
- Post-treatment
- Clinical intent
- Body contour and line balancing, planned by volume need and travel recovery window.
- Result variability
- Outcome depends on anatomy, procedure scope, and recovery timing.
- Safety & disclosure
- Results are not guaranteed and vary by individual.
Individual results may vary.
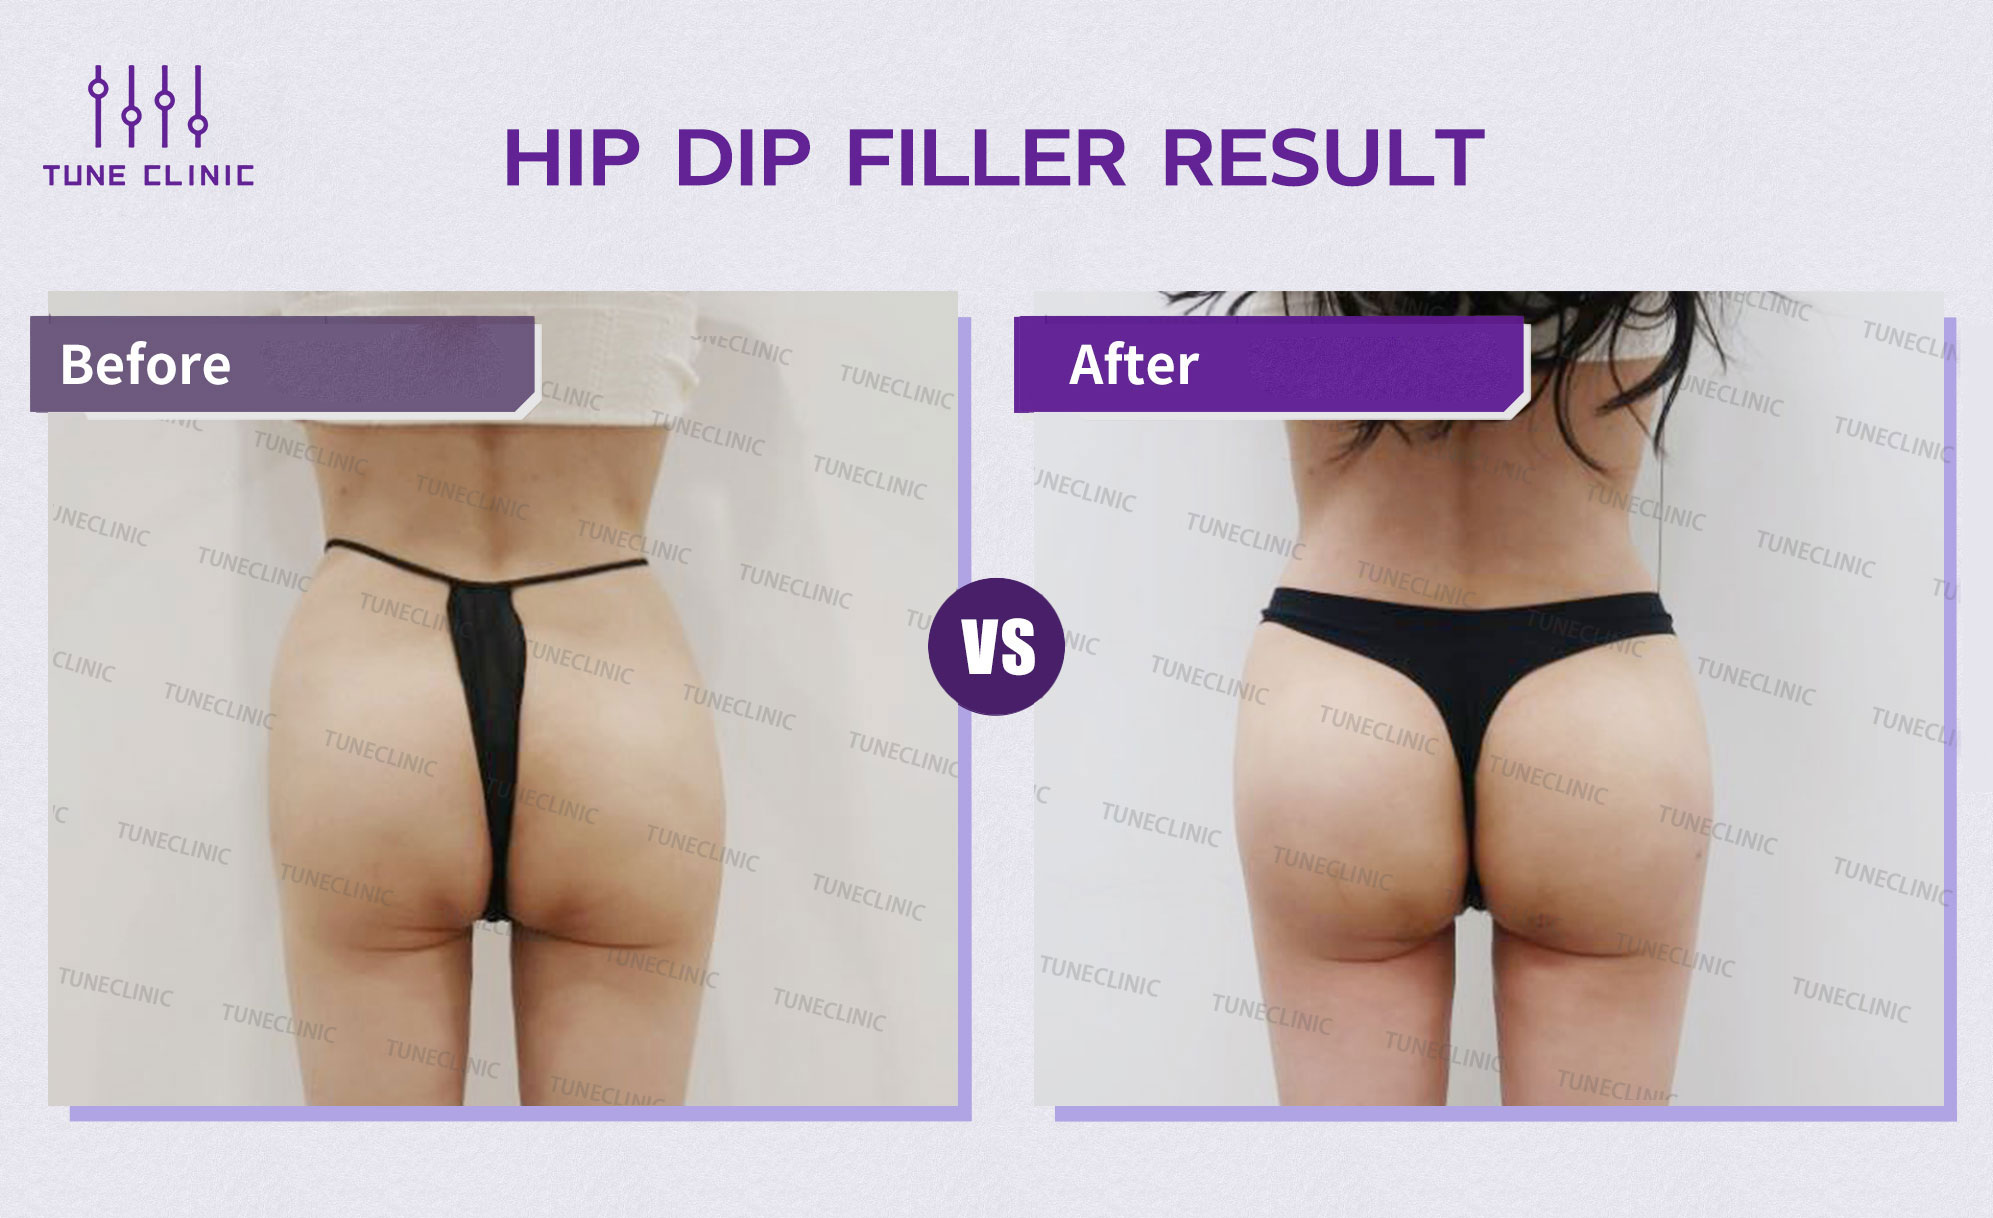
Body Contour
Hip Contour Balancing
Structural filler application to address lateral anatomical depressions.
Clinical reference only. Individual results vary. Not a guarantee of outcome.
View Details
- Timeframe
- Post-treatment
- Clinical intent
- Body contour and line balancing, planned by volume need and travel recovery window.
- Result variability
- Outcome depends on anatomy, procedure scope, and recovery timing.
- Safety & disclosure
- Results are not guaranteed and vary by individual.
Individual results may vary.
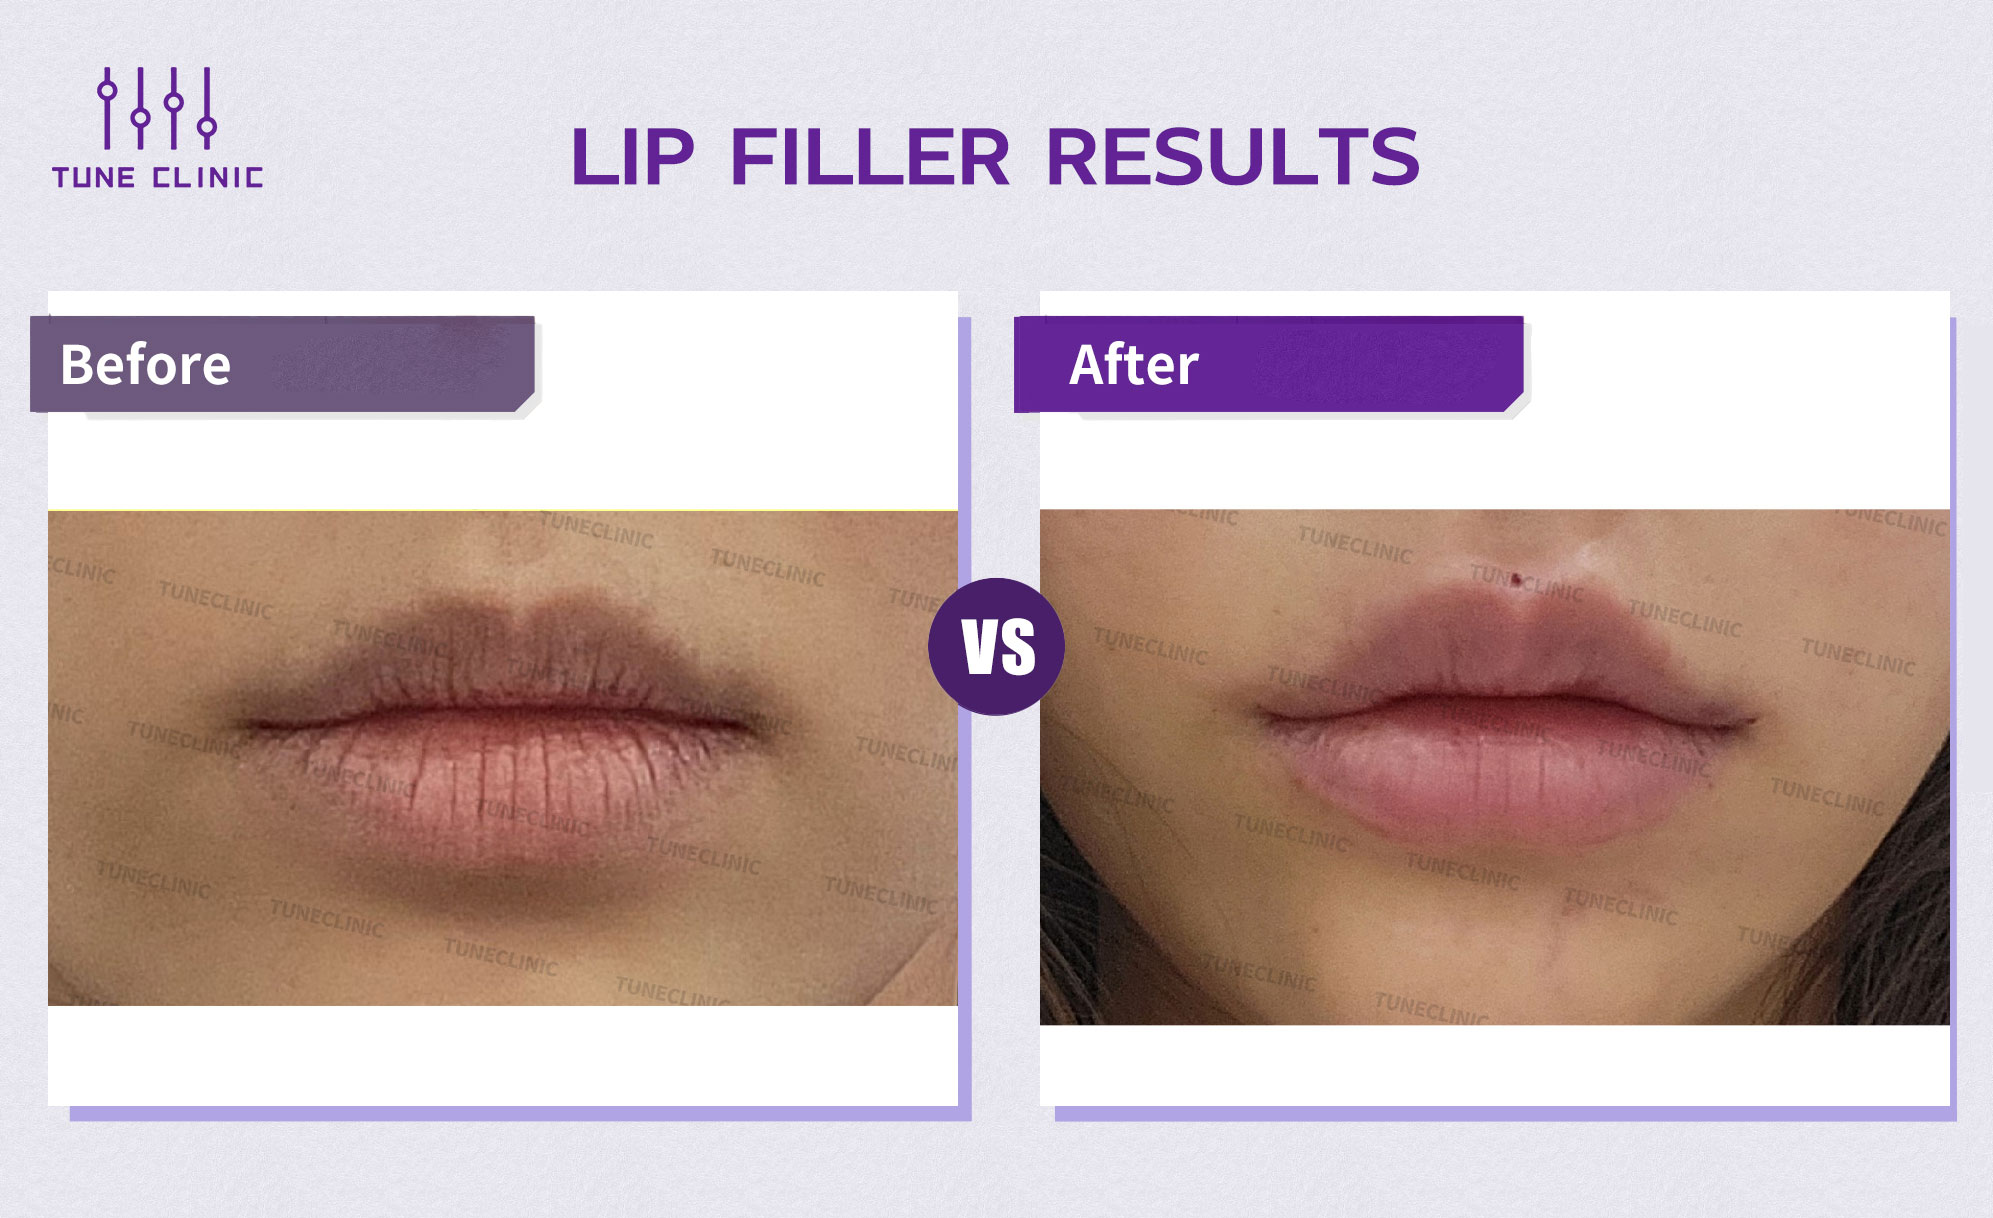
Facial Balance
Lip Volume & Symmetry
Subtle volume enhancement and symmetry correction respecting natural anatomy.
Clinical reference only. Individual results vary. Not a guarantee of outcome.
View Details
- Timeframe
- Post-treatment
- Clinical intent
- Facial balance and proportion planning, interpreted through physician assessment rather than photo matching.
- Result variability
- Outcome depends on anatomy, procedure scope, and recovery timing.
- Safety & disclosure
- Results are not guaranteed and vary by individual.
Individual results may vary.
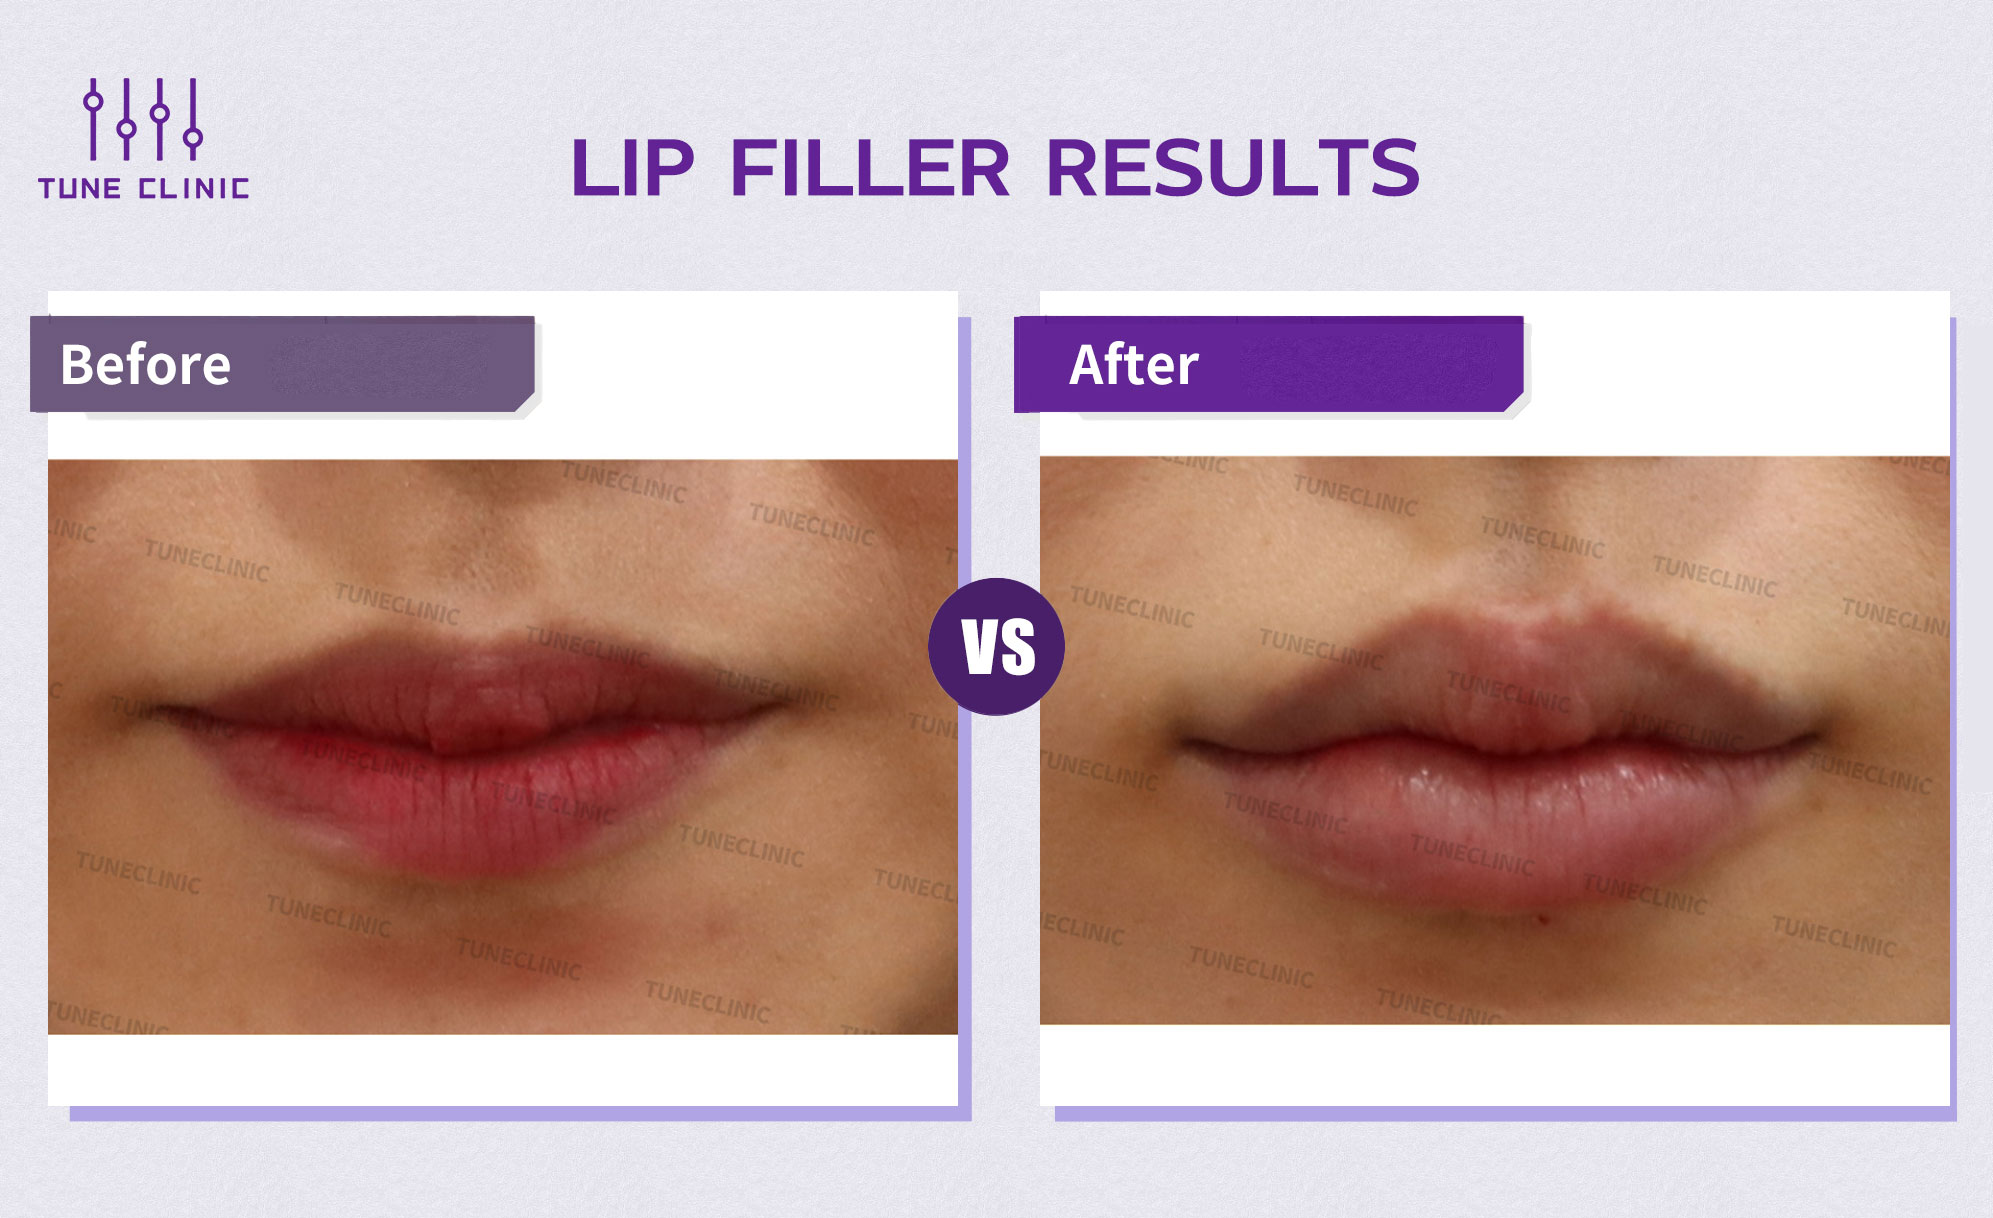
Facial Balance
Lip Contouring Focus
Enhanced vermilion border definition and central volume without artificial projection.
Clinical reference only. Individual results vary. Not a guarantee of outcome.
View Details
- Timeframe
- Post-treatment
- Clinical intent
- Facial balance and proportion planning, interpreted through physician assessment rather than photo matching.
- Result variability
- Outcome depends on anatomy, procedure scope, and recovery timing.
- Safety & disclosure
- Results are not guaranteed and vary by individual.
Individual results may vary.
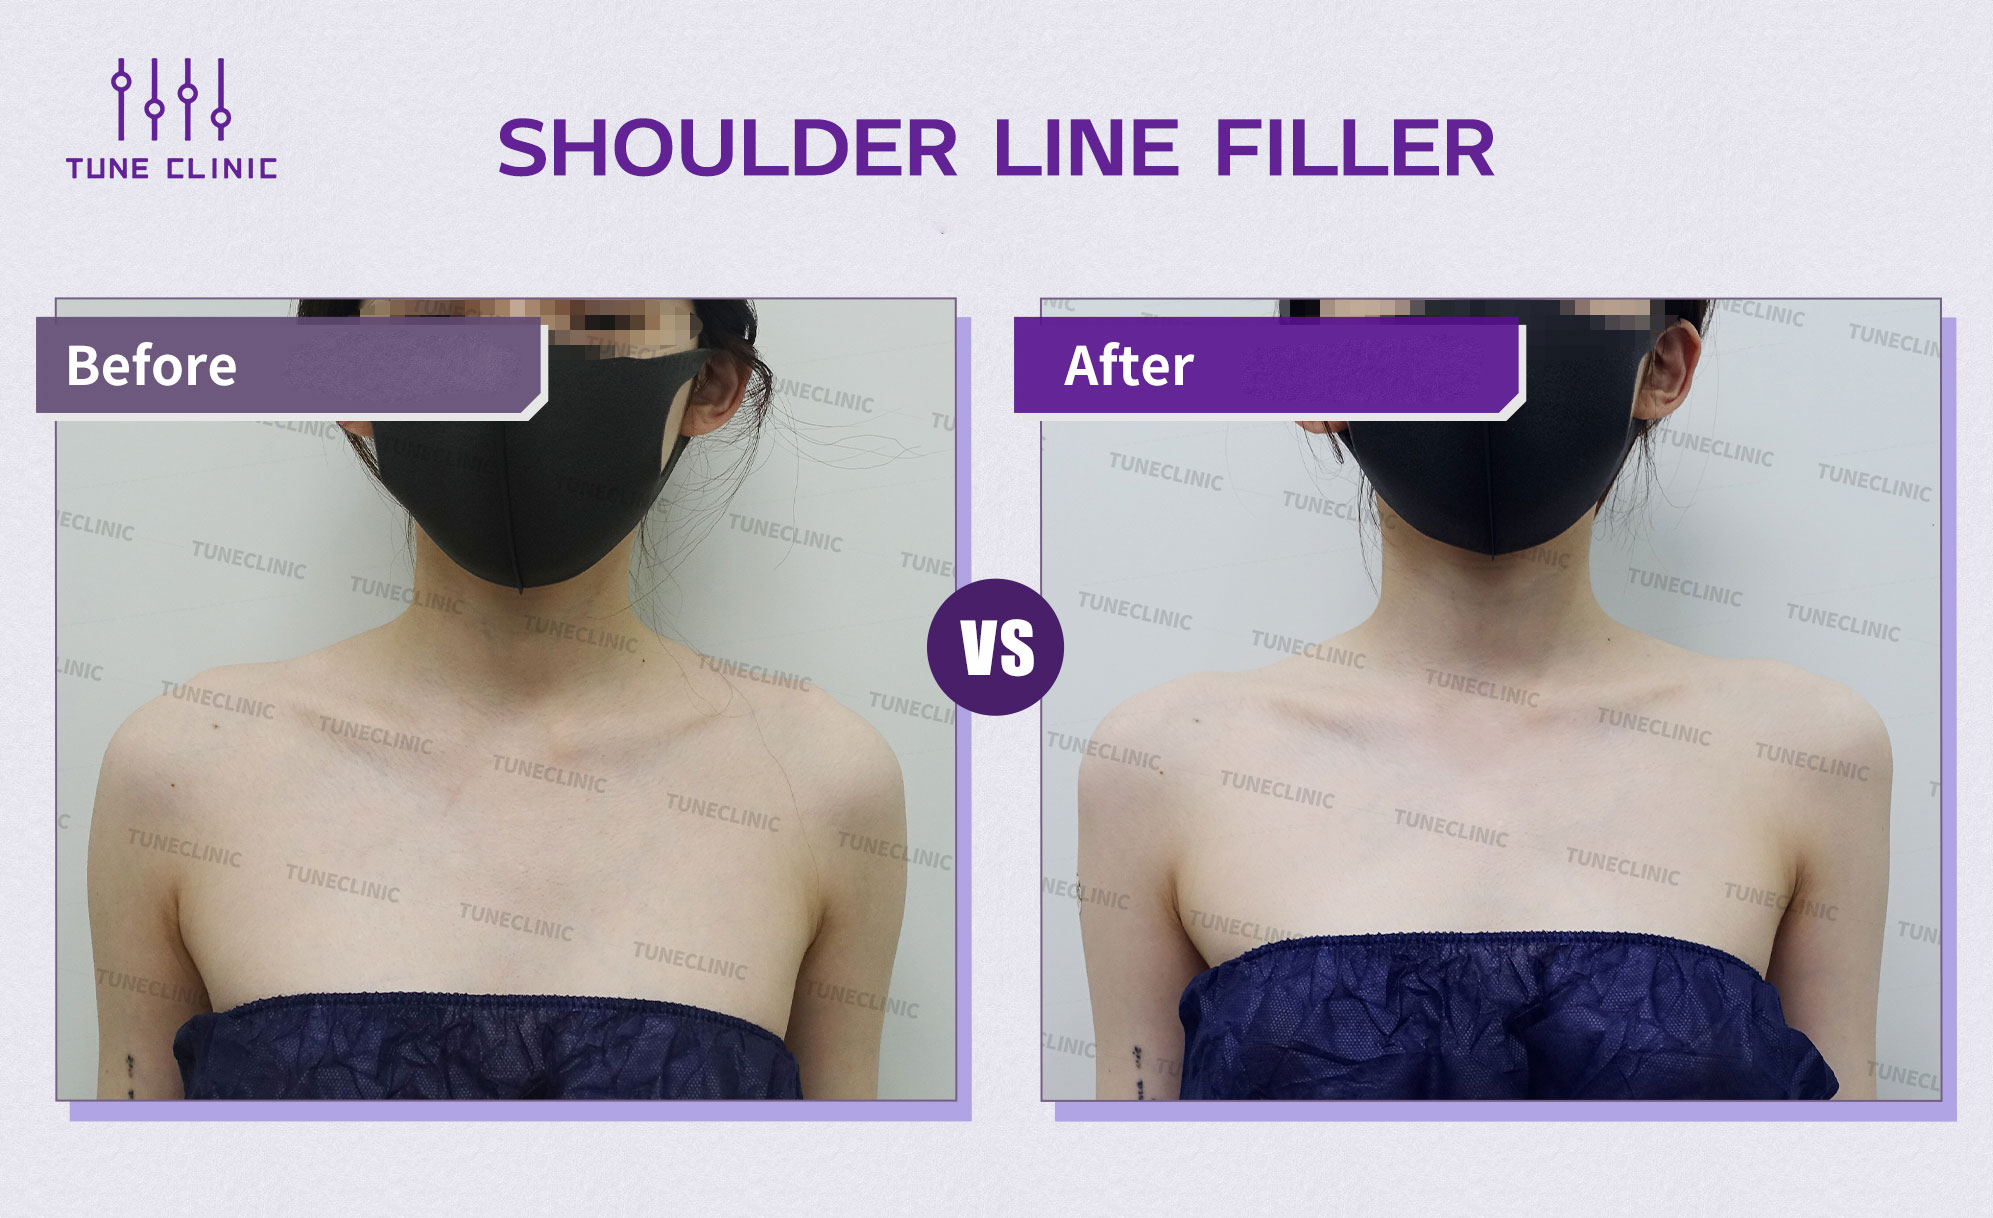
Body Contour
Shoulder Line Filler
Trapezius and shoulder line contouring for an elegant neckline silhouette.
Clinical reference only. Individual results vary. Not a guarantee of outcome.
View Details
- Timeframe
- Post-treatment
- Clinical intent
- Body contour and line balancing, planned by volume need and travel recovery window.
- Result variability
- Outcome depends on anatomy, procedure scope, and recovery timing.
- Safety & disclosure
- Results are not guaranteed and vary by individual.
Individual results may vary.
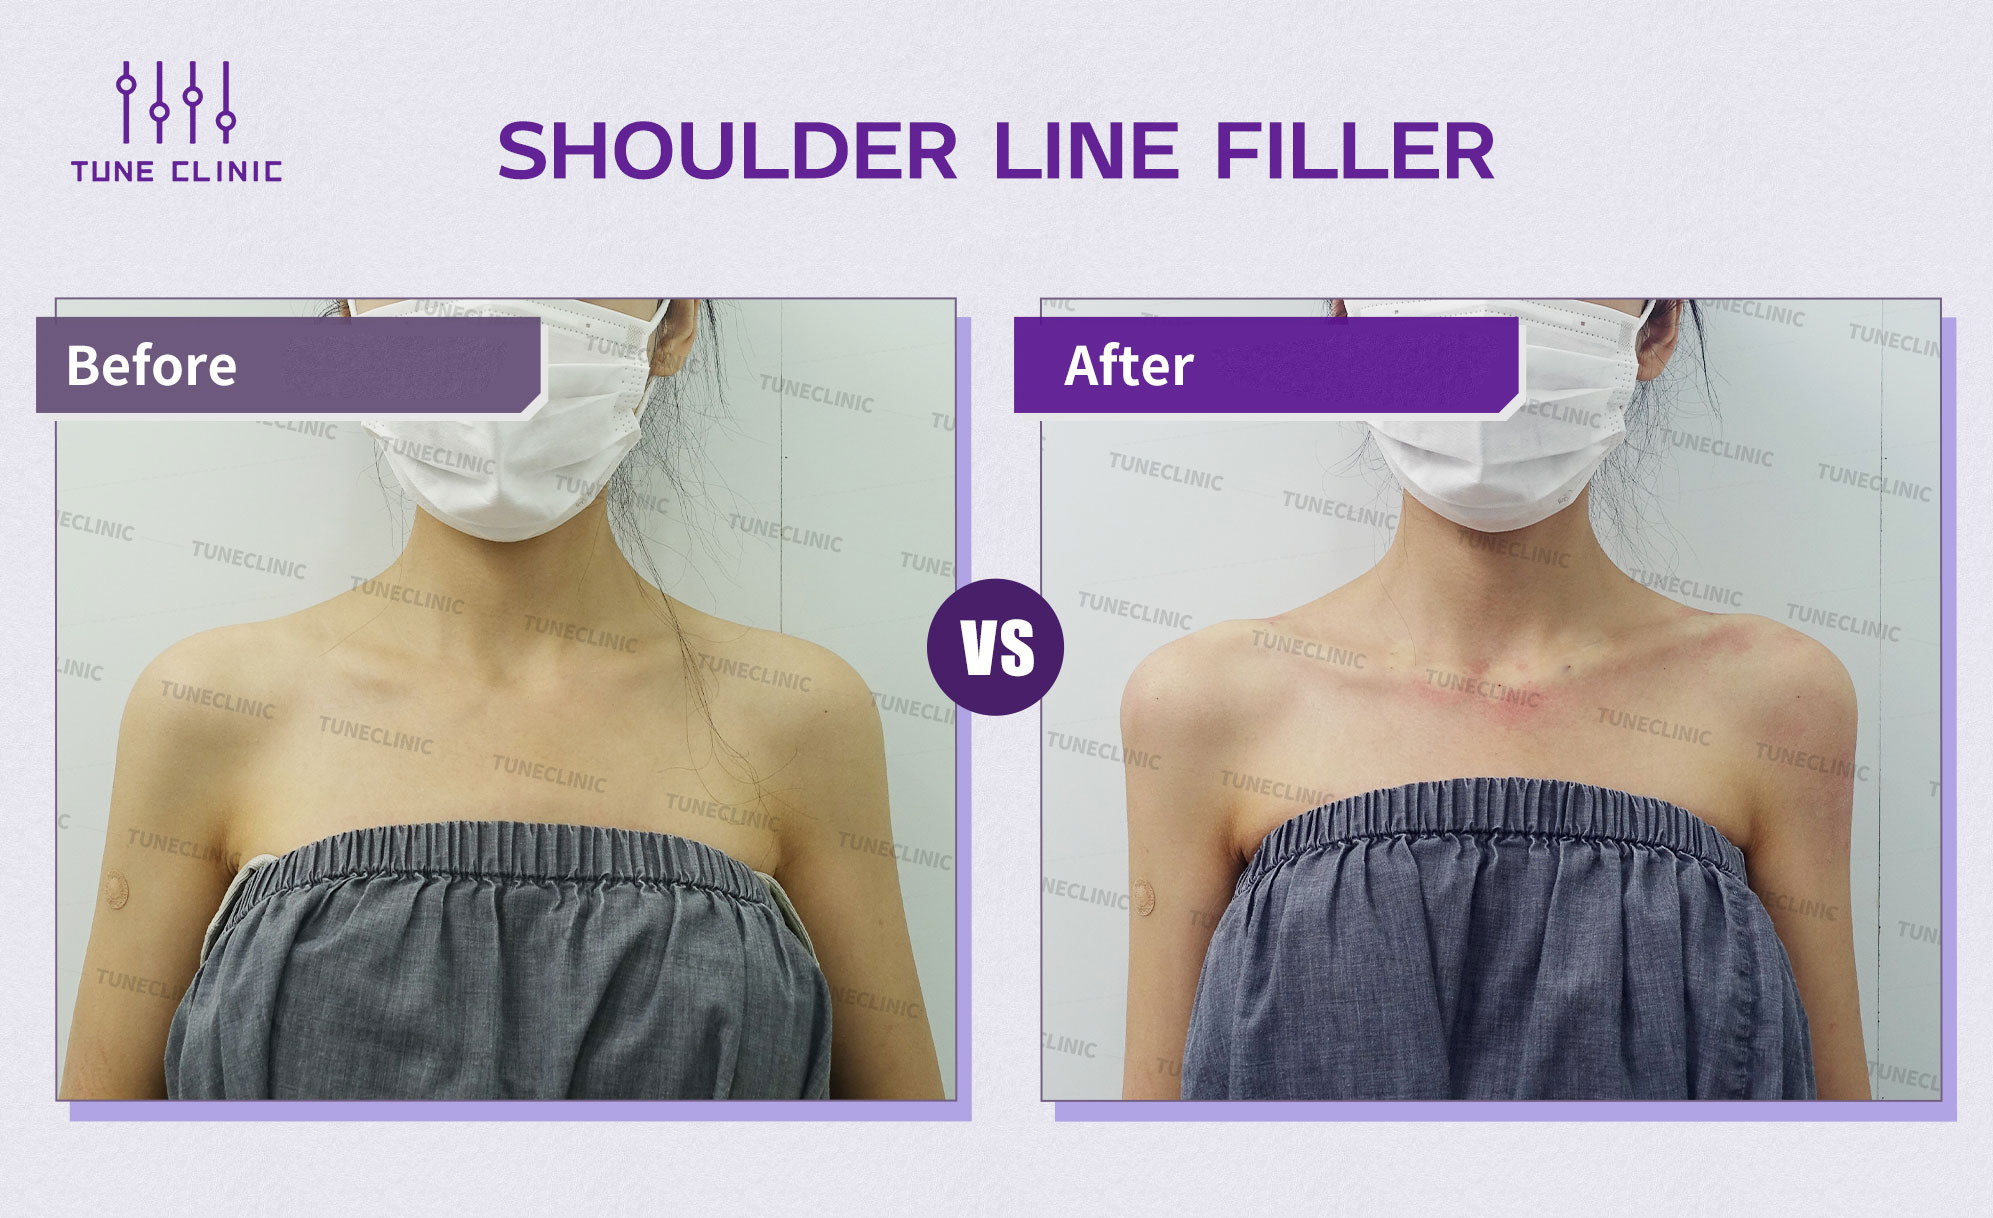
Body Contour
Shoulder Line Refinement
Targeted volume for proportional balance and shoulder symmetry.
Clinical reference only. Individual results vary. Not a guarantee of outcome.
View Details
- Timeframe
- Post-treatment
- Clinical intent
- Body contour and line balancing, planned by volume need and travel recovery window.
- Result variability
- Outcome depends on anatomy, procedure scope, and recovery timing.
- Safety & disclosure
- Results are not guaranteed and vary by individual.
Individual results may vary.
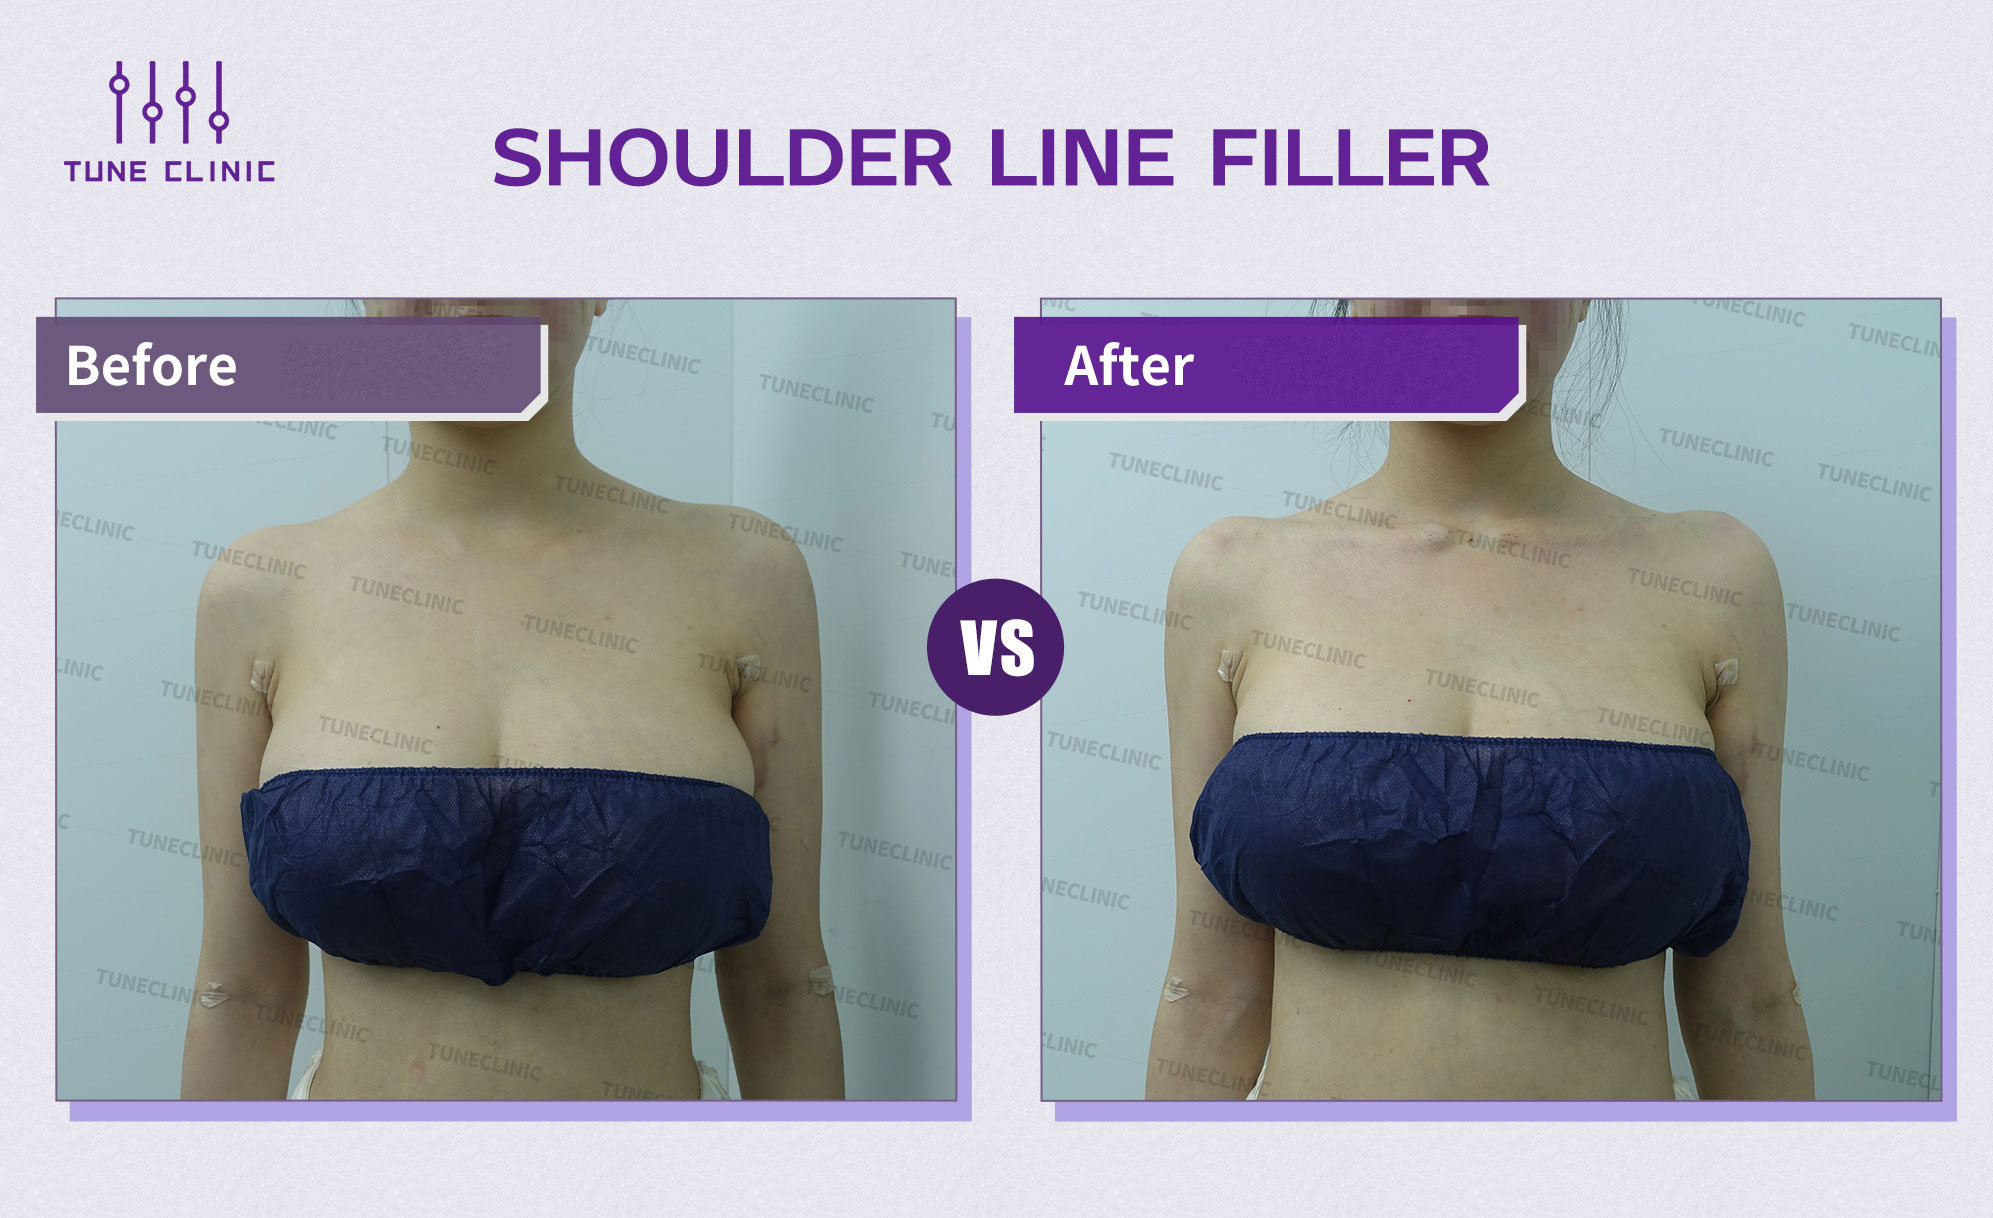
Body Contour
Shoulder Line Contouring
Restored structure along the clavicle line for a distinct aesthetic frame.
Clinical reference only. Individual results vary. Not a guarantee of outcome.
View Details
- Timeframe
- Post-treatment
- Clinical intent
- Body contour and line balancing, planned by volume need and travel recovery window.
- Result variability
- Outcome depends on anatomy, procedure scope, and recovery timing.
- Safety & disclosure
- Results are not guaranteed and vary by individual.
Individual results may vary.
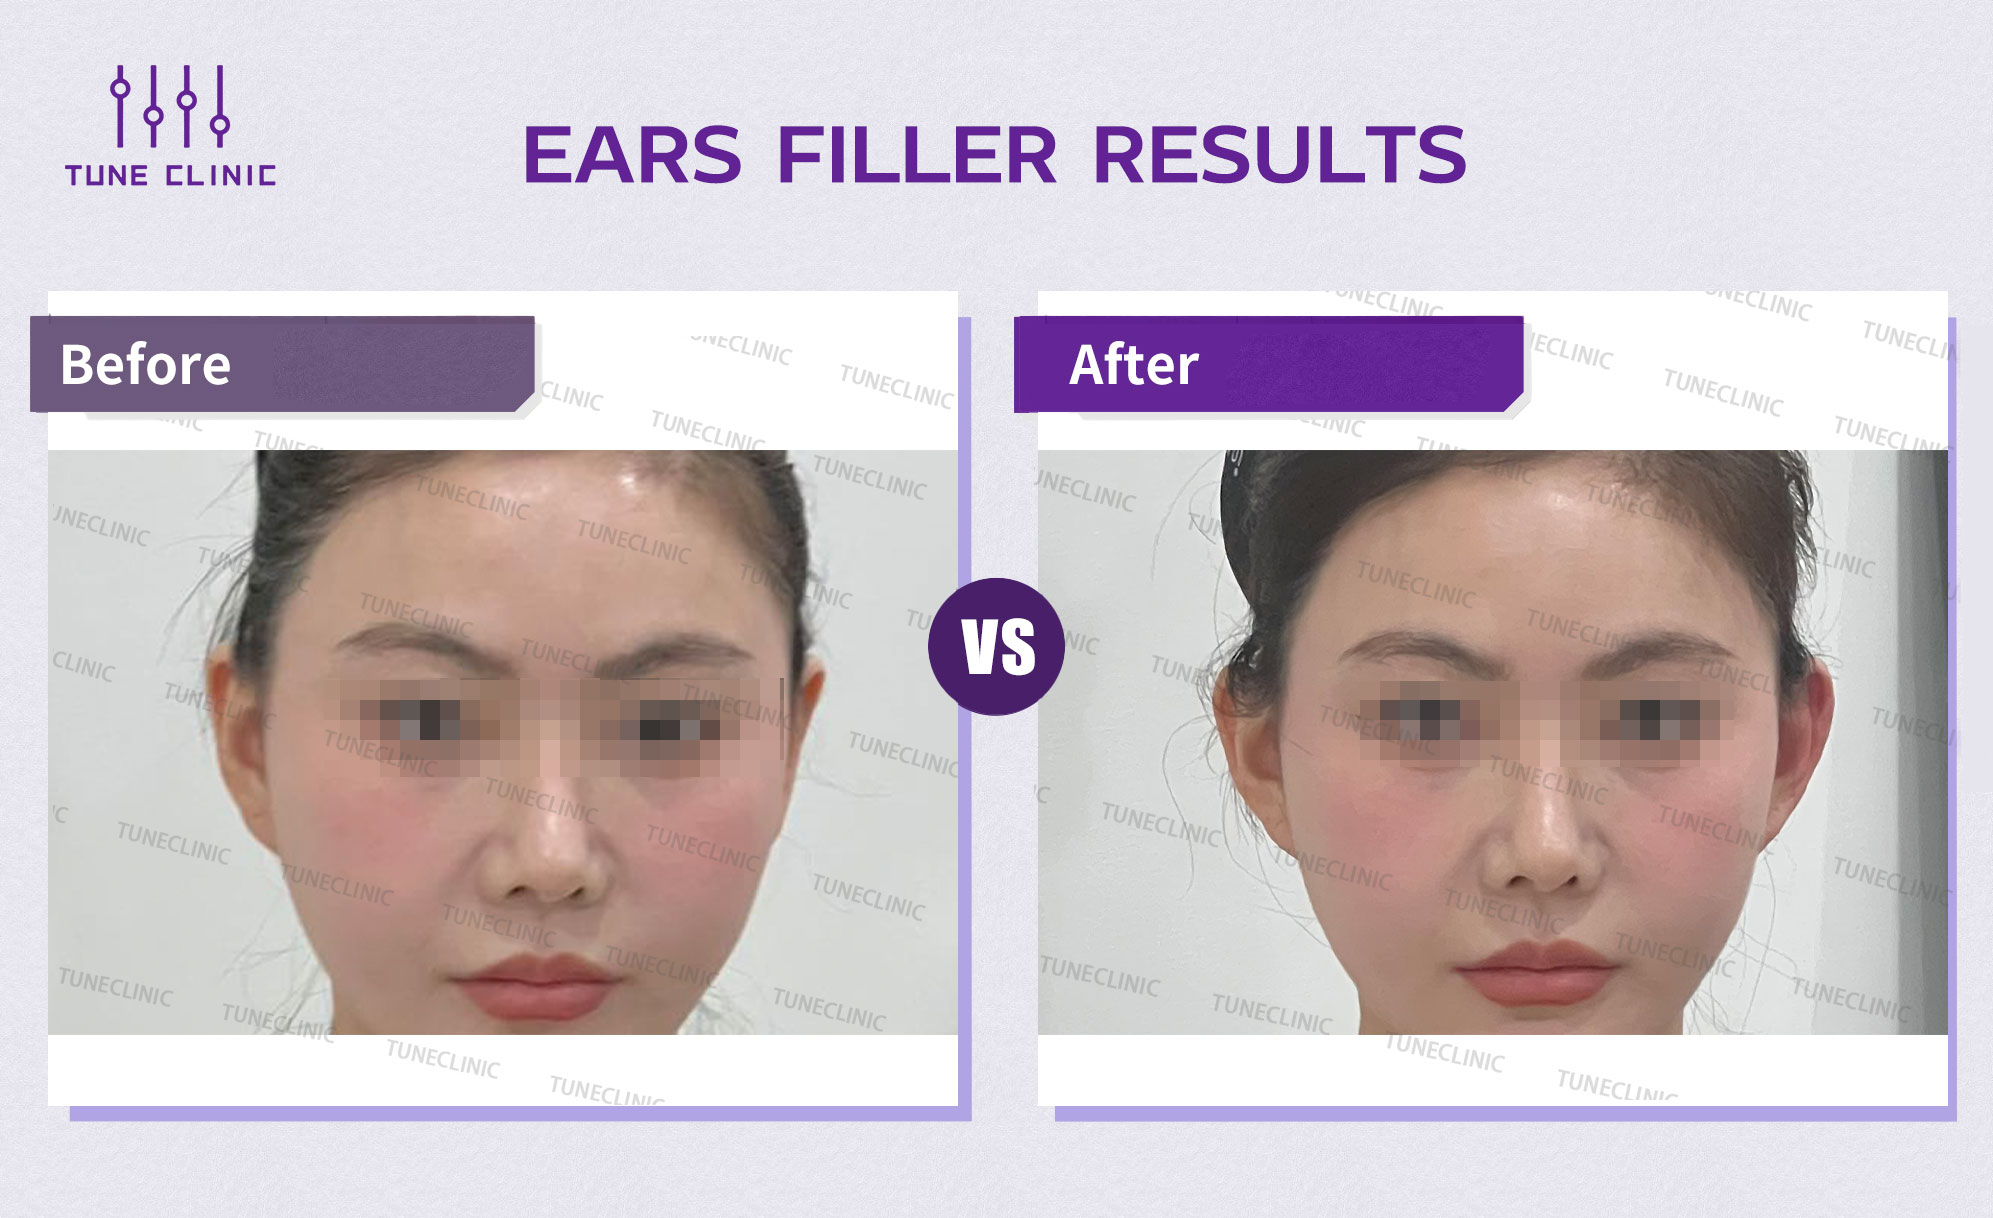
Facial Balance
Ear Lobe Filler
Restored earlobe volume and structural shape for a youthful contour.
Clinical reference only. Individual results vary. Not a guarantee of outcome.
View Details
- Timeframe
- Post-treatment
- Clinical intent
- Facial balance and proportion planning, interpreted through physician assessment rather than photo matching.
- Result variability
- Outcome depends on anatomy, procedure scope, and recovery timing.
- Safety & disclosure
- Results are not guaranteed and vary by individual.
Individual results may vary.
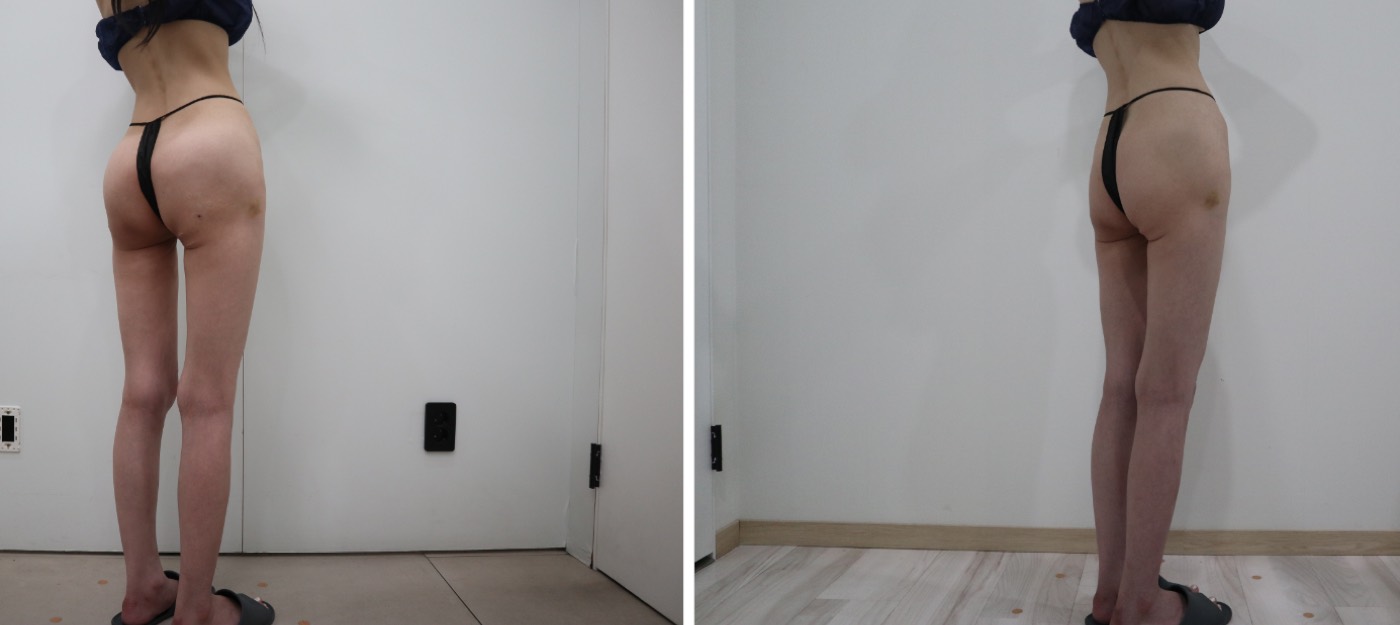
Body Contour
Hip & Buttock Filler — Side View
Same patient, multiple angles (one treatment case shown in three views). Camera distance differs between before and after frames.
Clinical reference only. Individual results vary. Not a guarantee of outcome.
View Details
- Timeframe
- Interval not specified; discussed at consultation
- Clinical intent
- Body contour and line balancing, planned by volume need and travel recovery window.
- Result variability
- Outcome depends on anatomy, procedure scope, and recovery timing.
- Safety & disclosure
- Bruising and swelling are common short-term effects after filler treatment and can be visible in early photos; uncommonly asymmetry, and rarely vascular complications. All risks are explained at consultation. Results are not guaranteed and vary by individual.
Individual results may vary.
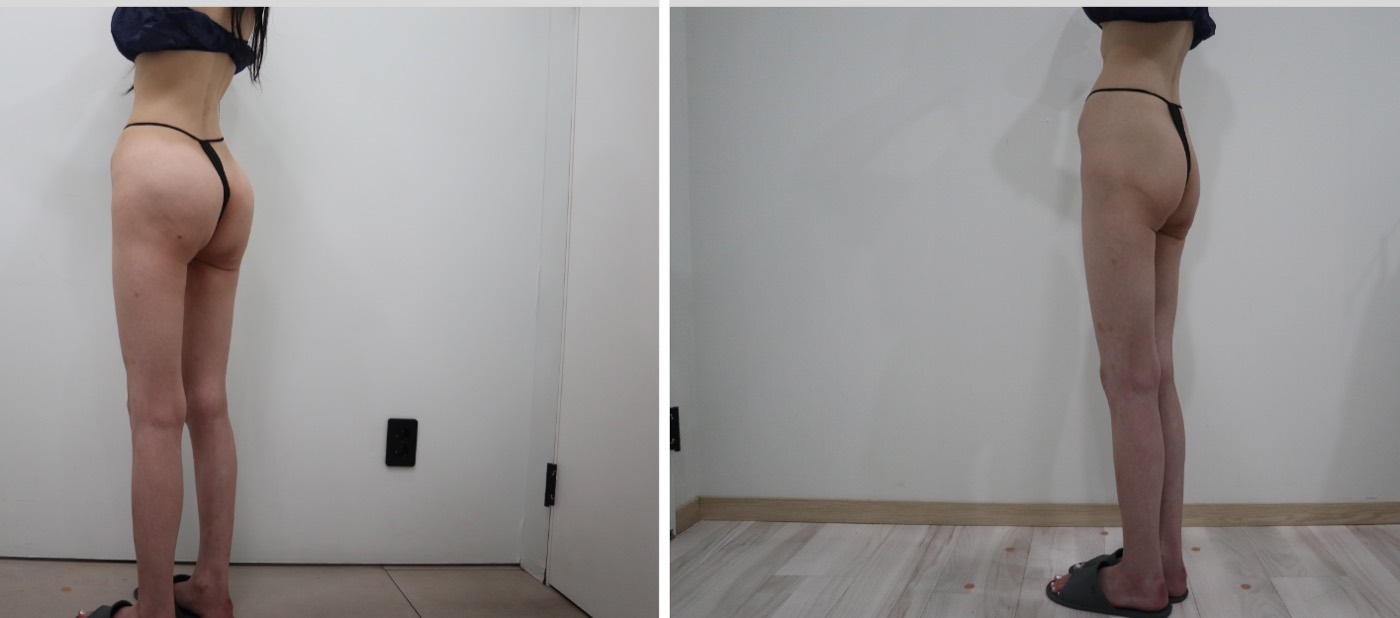
Body Contour
Hip & Buttock Filler — Rear Angle
Same patient, multiple angles (one treatment case shown in three views). Visible bruising in the after photo is an expected short-term effect.
Clinical reference only. Individual results vary. Not a guarantee of outcome.
View Details
- Timeframe
- Interval not specified; discussed at consultation
- Clinical intent
- Body contour and line balancing, planned by volume need and travel recovery window.
- Result variability
- Outcome depends on anatomy, procedure scope, and recovery timing.
- Safety & disclosure
- Bruising and swelling are common short-term effects after filler treatment and can be visible in early photos; uncommonly asymmetry, and rarely vascular complications. All risks are explained at consultation. Results are not guaranteed and vary by individual.
Individual results may vary.
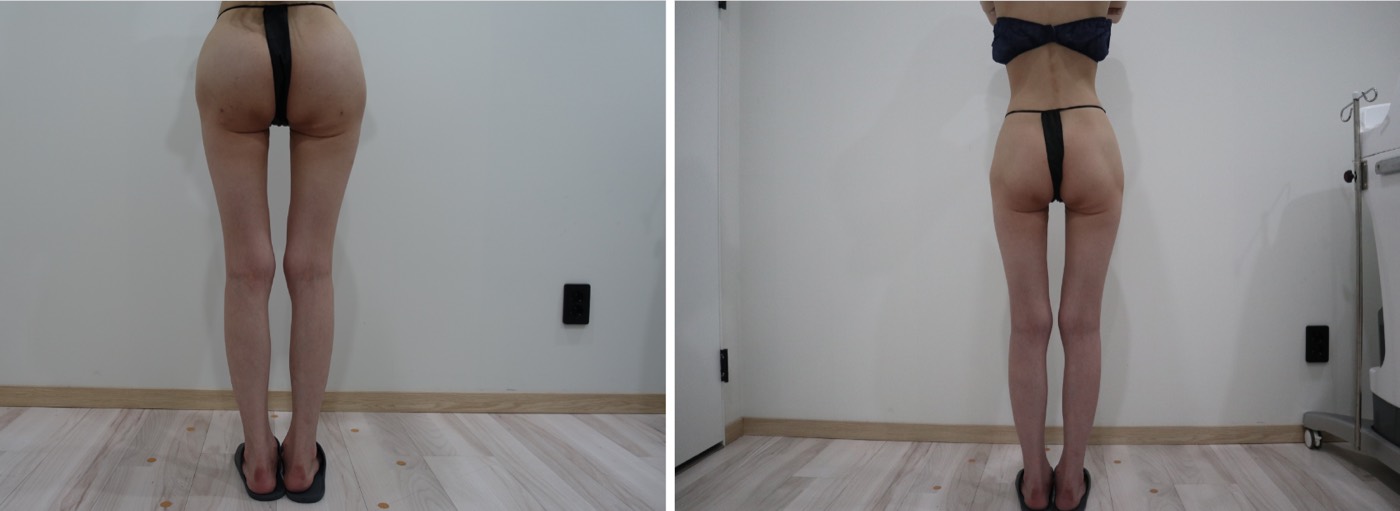
Body Contour
Hip & Buttock Filler — Rear View
Same patient, multiple angles (one treatment case shown in three views). Camera distance differs between before and after frames.
Clinical reference only. Individual results vary. Not a guarantee of outcome.
View Details
- Timeframe
- Interval not specified; discussed at consultation
- Clinical intent
- Body contour and line balancing, planned by volume need and travel recovery window.
- Result variability
- Outcome depends on anatomy, procedure scope, and recovery timing.
- Safety & disclosure
- Bruising and swelling are common short-term effects after filler treatment and can be visible in early photos; uncommonly asymmetry, and rarely vascular complications. All risks are explained at consultation. Results are not guaranteed and vary by individual.
Individual results may vary.
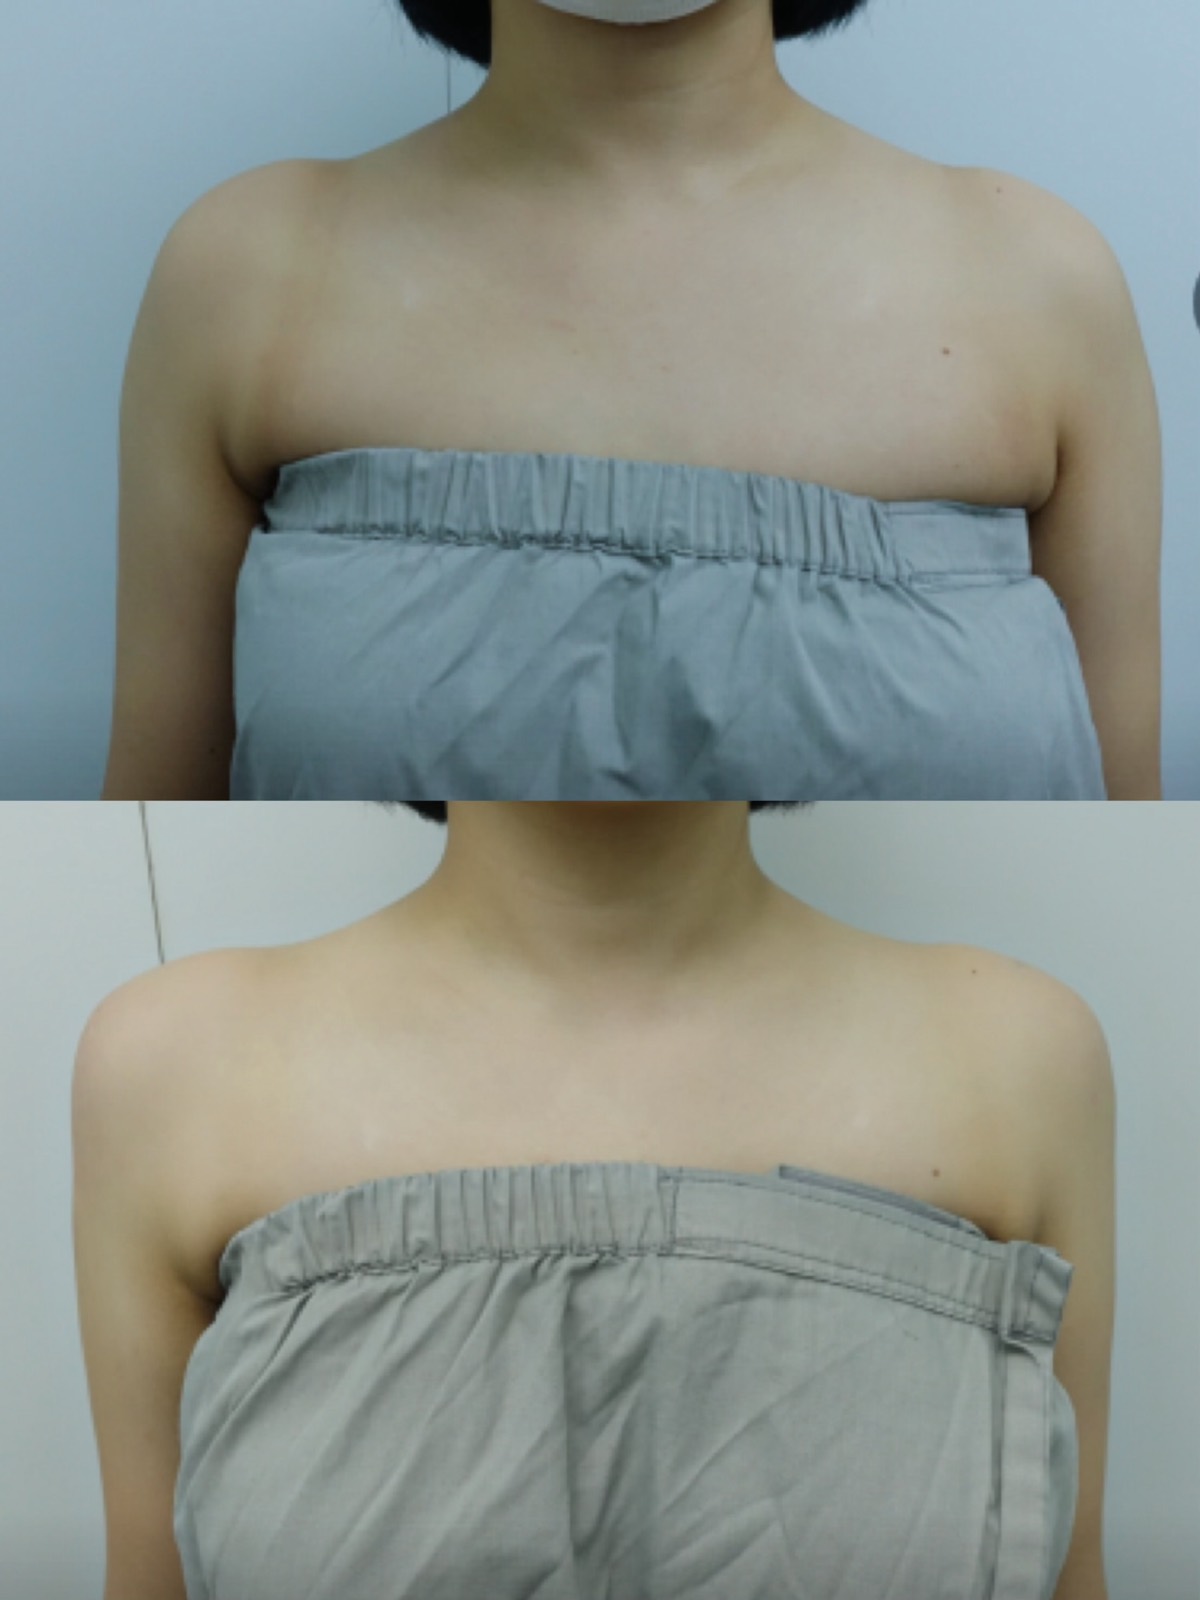
Body Contour
Shoulder Line Filler — Front
Clavicle and shoulder line contouring, front clinical photography.
Clinical reference only. Individual results vary. Not a guarantee of outcome.
View Details
- Timeframe
- Interval not specified; discussed at consultation
- Clinical intent
- Body contour and line balancing, planned by volume need and travel recovery window.
- Result variability
- Outcome depends on anatomy, procedure scope, and recovery timing.
- Safety & disclosure
- Bruising and swelling are common short-term effects after filler treatment and can be visible in early photos; uncommonly asymmetry, and rarely vascular complications. All risks are explained at consultation. Results are not guaranteed and vary by individual.
Individual results may vary.
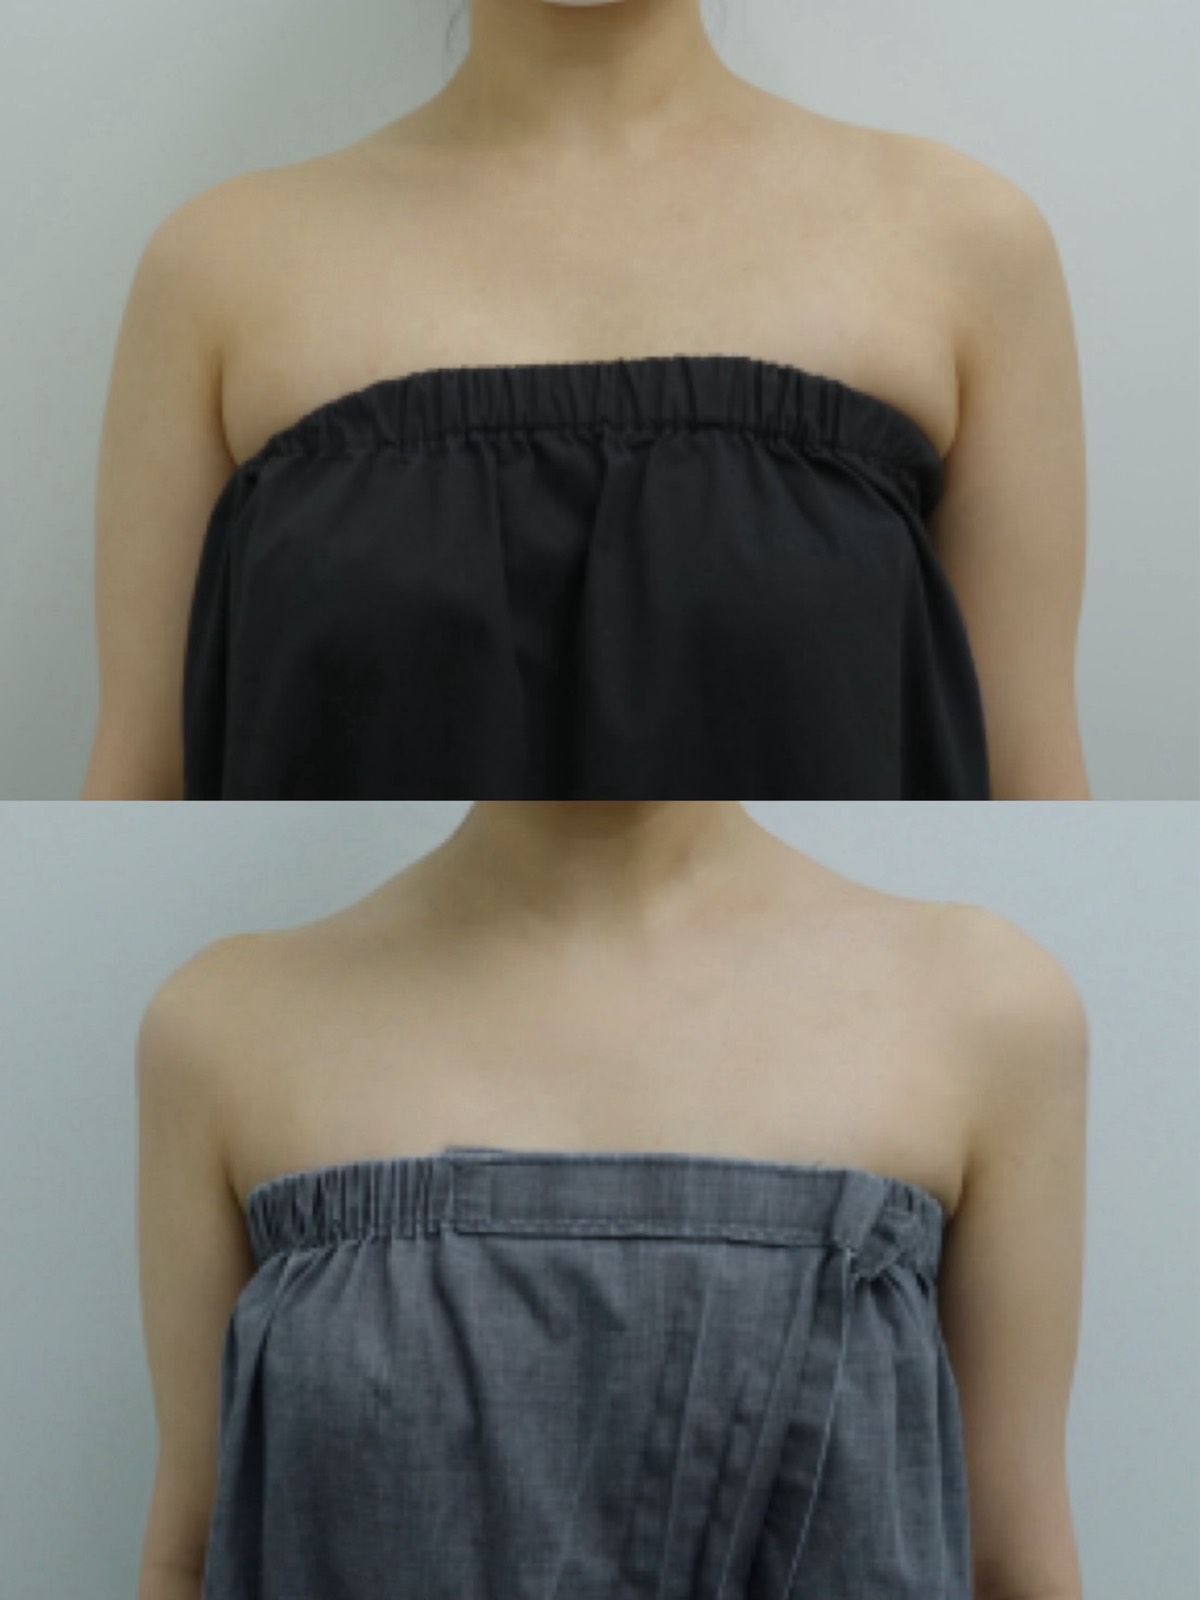
Body Contour
Shoulder Line Filler — Frontal Series
Shoulder line contouring, front clinical photography.
Clinical reference only. Individual results vary. Not a guarantee of outcome.
View Details
- Timeframe
- Interval not specified; discussed at consultation
- Clinical intent
- Body contour and line balancing, planned by volume need and travel recovery window.
- Result variability
- Outcome depends on anatomy, procedure scope, and recovery timing.
- Safety & disclosure
- Bruising and swelling are common short-term effects after filler treatment and can be visible in early photos; uncommonly asymmetry, and rarely vascular complications. All risks are explained at consultation. Results are not guaranteed and vary by individual.
Individual results may vary.
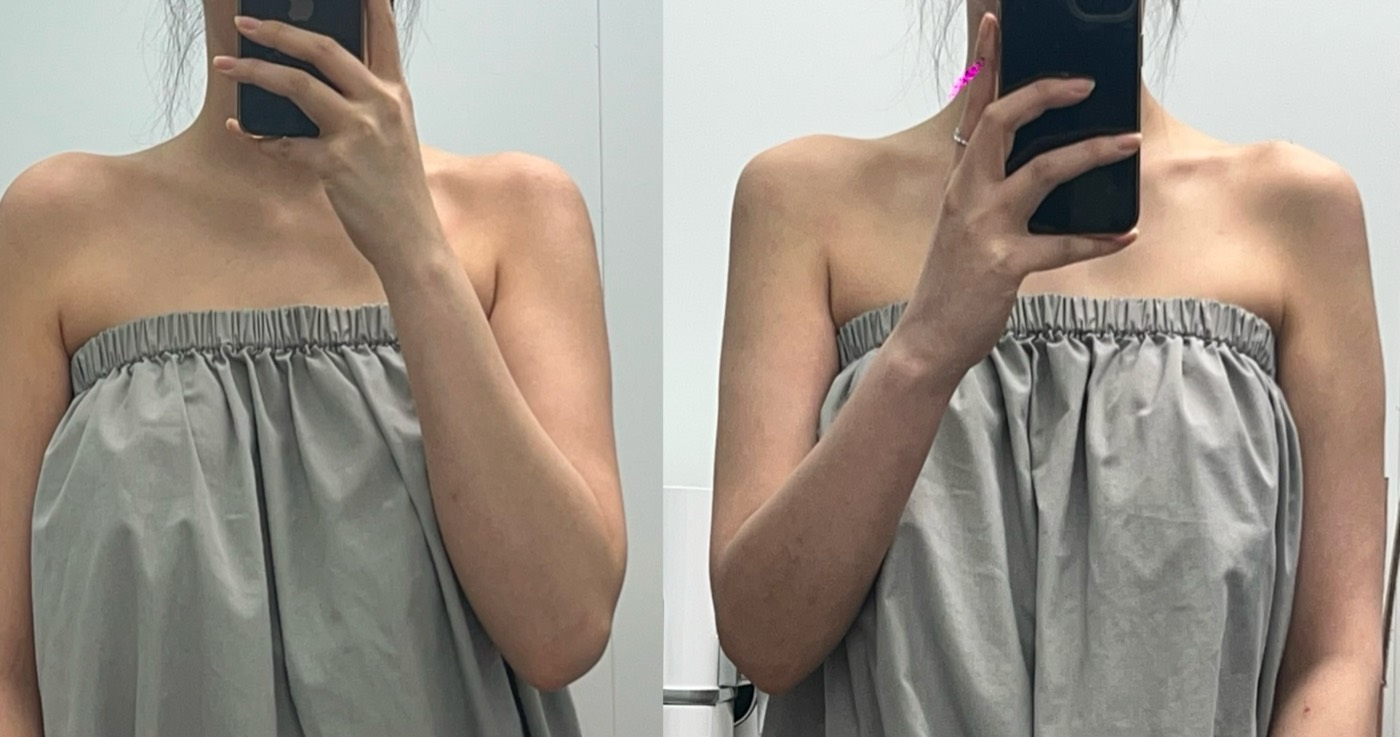
Patient-provided photos, not standardized clinical photography.
Body Contour
Shoulder Line Filler — Mirror View
Trapezius and shoulder line contouring.
Clinical reference only. Individual results vary. Not a guarantee of outcome.
View Details
- Timeframe
- Interval not specified; discussed at consultation
- Clinical intent
- Body contour and line balancing, planned by volume need and travel recovery window.
- Result variability
- Outcome depends on anatomy, procedure scope, and recovery timing.
- Safety & disclosure
- Patient-provided photos, not standardized clinical photography. Bruising and swelling are common short-term effects after filler treatment and can be visible in early photos; uncommonly asymmetry, and rarely vascular complications. All risks are explained at consultation. Results are not guaranteed and vary by individual.
Individual results may vary.
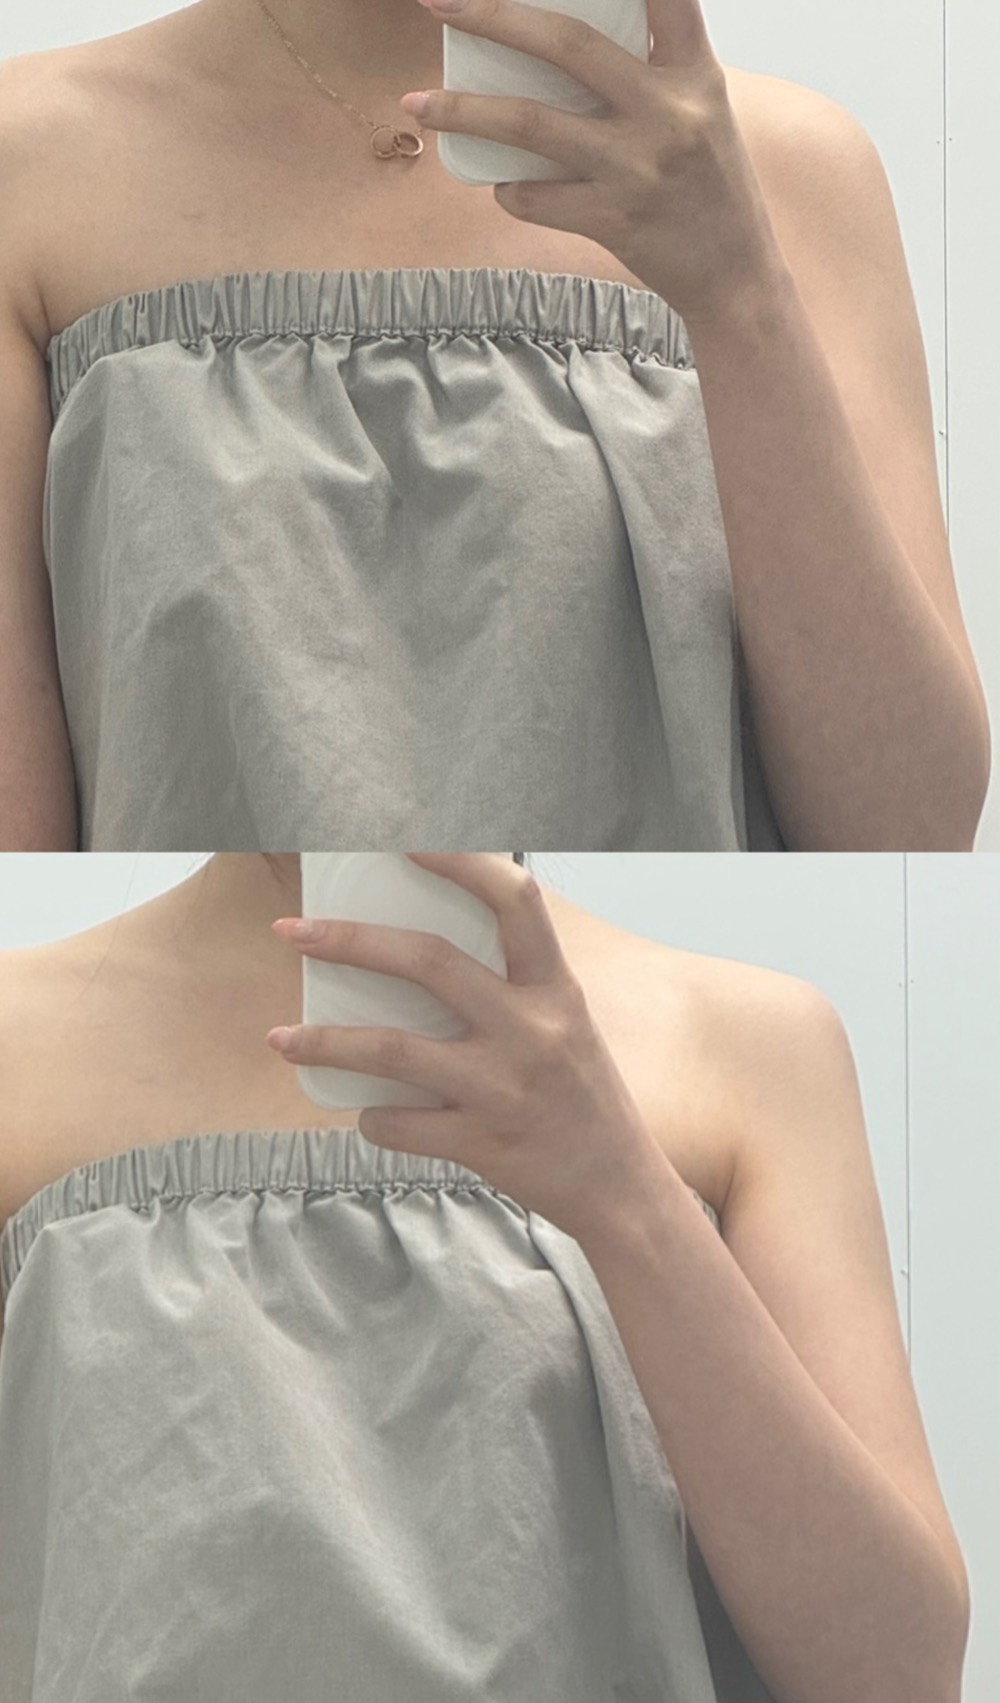
Patient-provided photos, not standardized clinical photography.
Body Contour
Shoulder Line Filler — Follow-up
Shoulder and neckline contouring.
Clinical reference only. Individual results vary. Not a guarantee of outcome.
View Details
- Timeframe
- Interval not specified; discussed at consultation
- Clinical intent
- Body contour and line balancing, planned by volume need and travel recovery window.
- Result variability
- Outcome depends on anatomy, procedure scope, and recovery timing.
- Safety & disclosure
- Patient-provided photos, not standardized clinical photography. Bruising and swelling are common short-term effects after filler treatment and can be visible in early photos; uncommonly asymmetry, and rarely vascular complications. All risks are explained at consultation. Results are not guaranteed and vary by individual.
Individual results may vary.
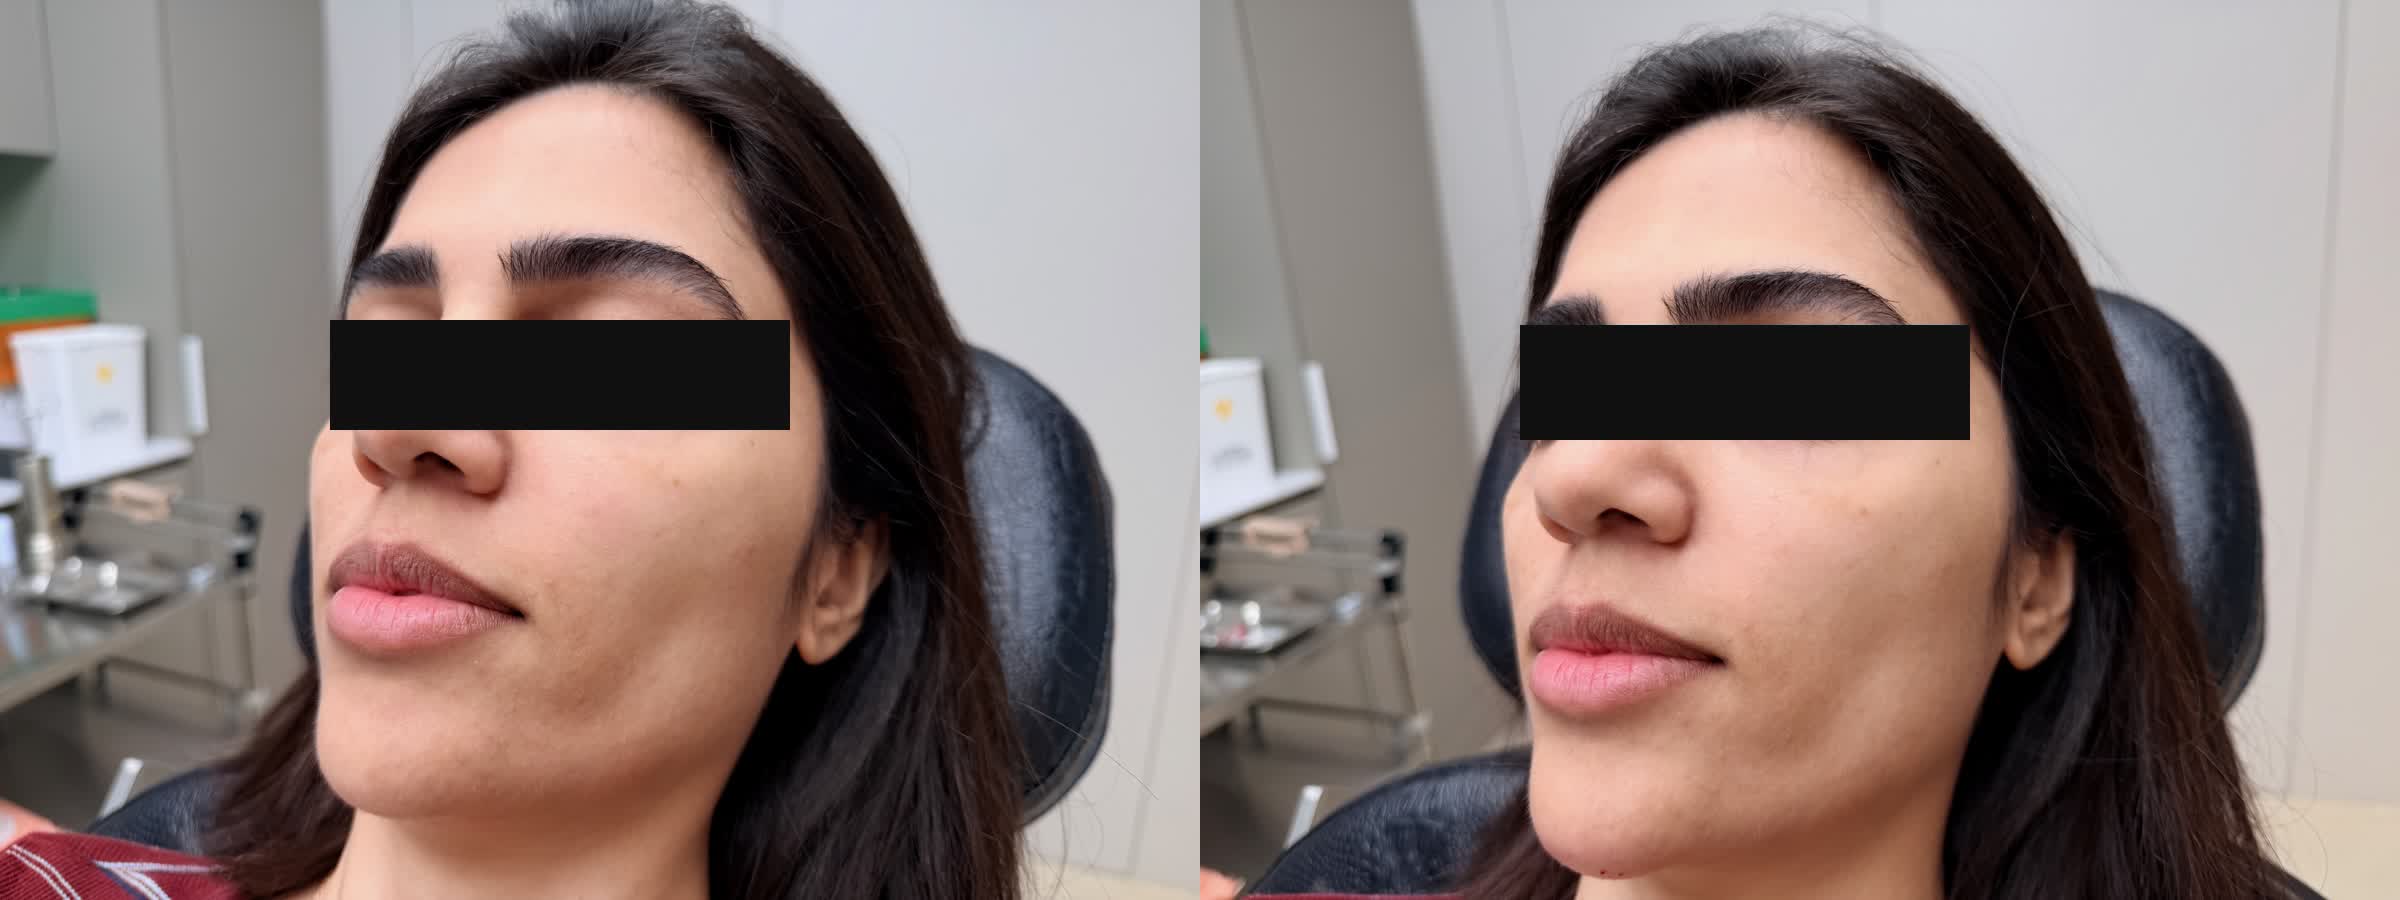
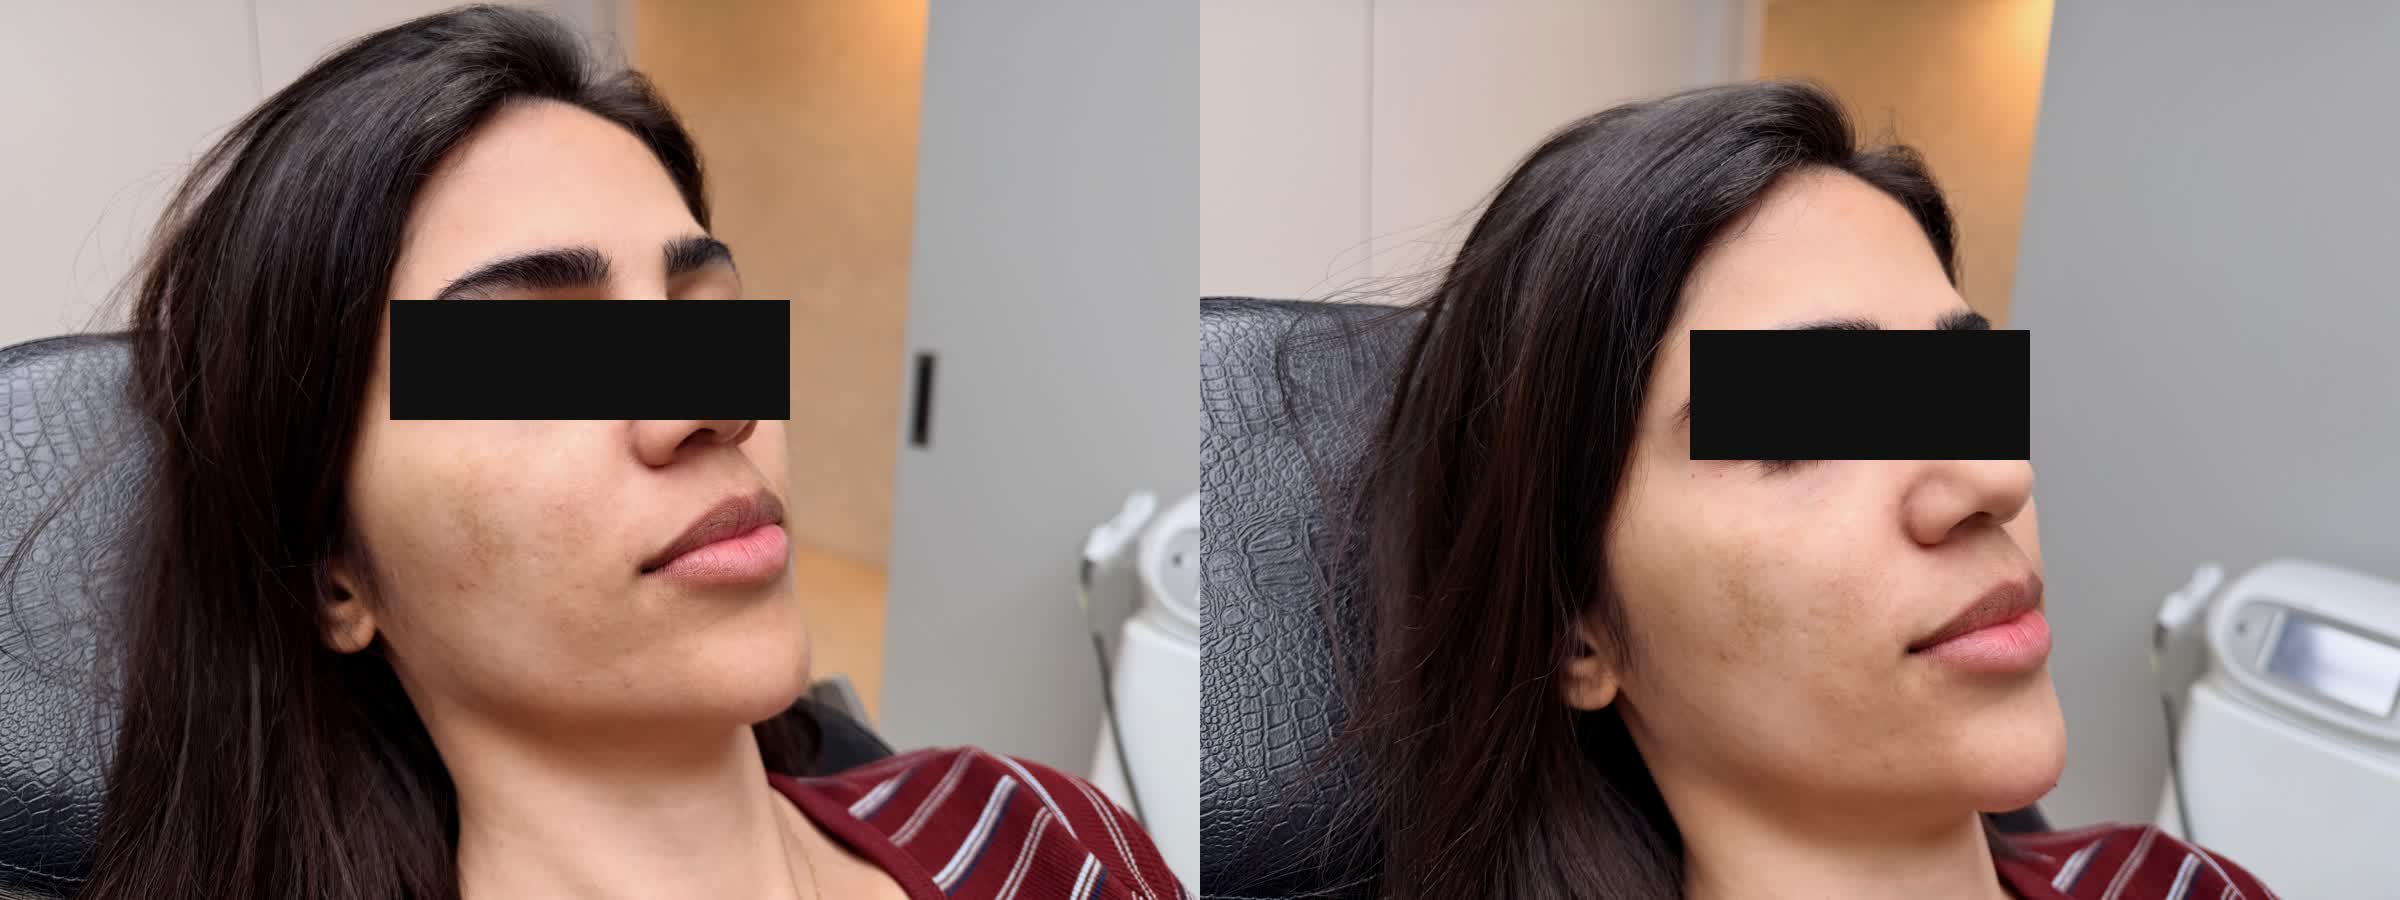
Clinic photographs with the patient's eyes masked at her request.
Facial Balance
Chin Filler, Left Profile
Same patient, two angles (one treatment case shown in two views). Hyaluronic acid filler placed at the chin for projection and a smoother lip-to-chin line; the after frame was taken the same day with swelling still present.
Clinical reference only. Individual results vary. Not a guarantee of outcome.
View Details
- Timeframe
- Same session; the second frame was taken minutes after injection, and the settled result is seen over about two weeks
- Clinical intent
- Facial balance and proportion planning, interpreted through physician assessment rather than photo matching.
- Result variability
- Outcome depends on anatomy, procedure scope, and recovery timing.
- Safety & disclosure
- Clinic photographs with the patient's eyes masked at her request. Bruising and swelling are common short-term effects after filler treatment and can be visible in early photos; uncommonly asymmetry, and rarely vascular complications. All risks are explained at consultation. Results are not guaranteed and vary by individual.
Individual results may vary.
Clinic photographs with the patient's eyes masked at her request.
Facial Balance
Chin Filler, Right Profile
Same patient, two angles (one treatment case shown in two views). Camera angle differs slightly between the two frames.
Clinical reference only. Individual results vary. Not a guarantee of outcome.
View Details
- Timeframe
- Same session; the second frame was taken minutes after injection, and the settled result is seen over about two weeks
- Clinical intent
- Facial balance and proportion planning, interpreted through physician assessment rather than photo matching.
- Result variability
- Outcome depends on anatomy, procedure scope, and recovery timing.
- Safety & disclosure
- Clinic photographs with the patient's eyes masked at her request. Bruising and swelling are common short-term effects after filler treatment and can be visible in early photos; uncommonly asymmetry, and rarely vascular complications. All risks are explained at consultation. Results are not guaranteed and vary by individual.
Individual results may vary.
Root Chungdam brows
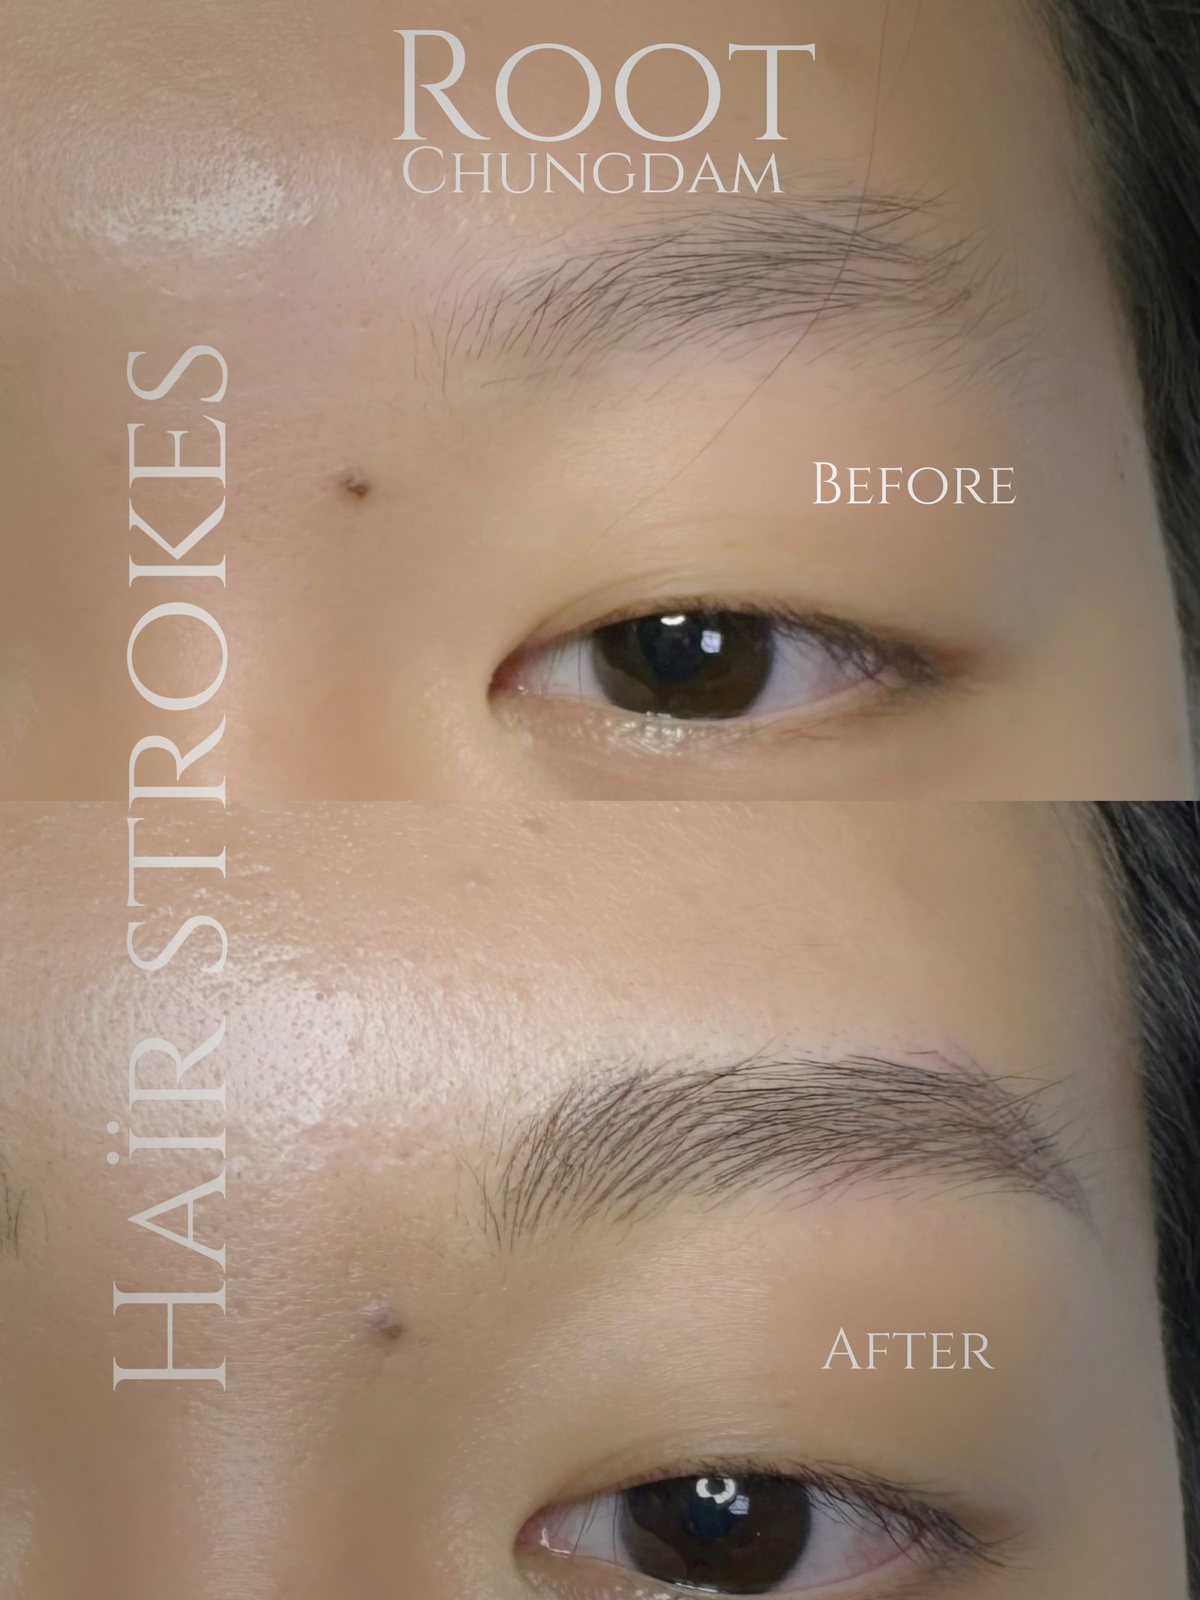
Published with the patient's consent as supplied by Root Chungdam.
Root Chungdam brows
Haïr Strokes by Root Chungdam, case 1
Hair-stroke brow work by Root Chungdam. Original labels supplied by Root Chungdam; photo interval and healing stage not provided. Results vary.
Artist portfolio reference. Individual results vary.
View Details
- Timeframe
- Not stated
- Technique
- Hair strokes (permanent makeup)
- Safety & disclosure
- Redness and flaking in the first days; colour settles over weeks. Results are not guaranteed and vary by individual.
Individual results may vary.
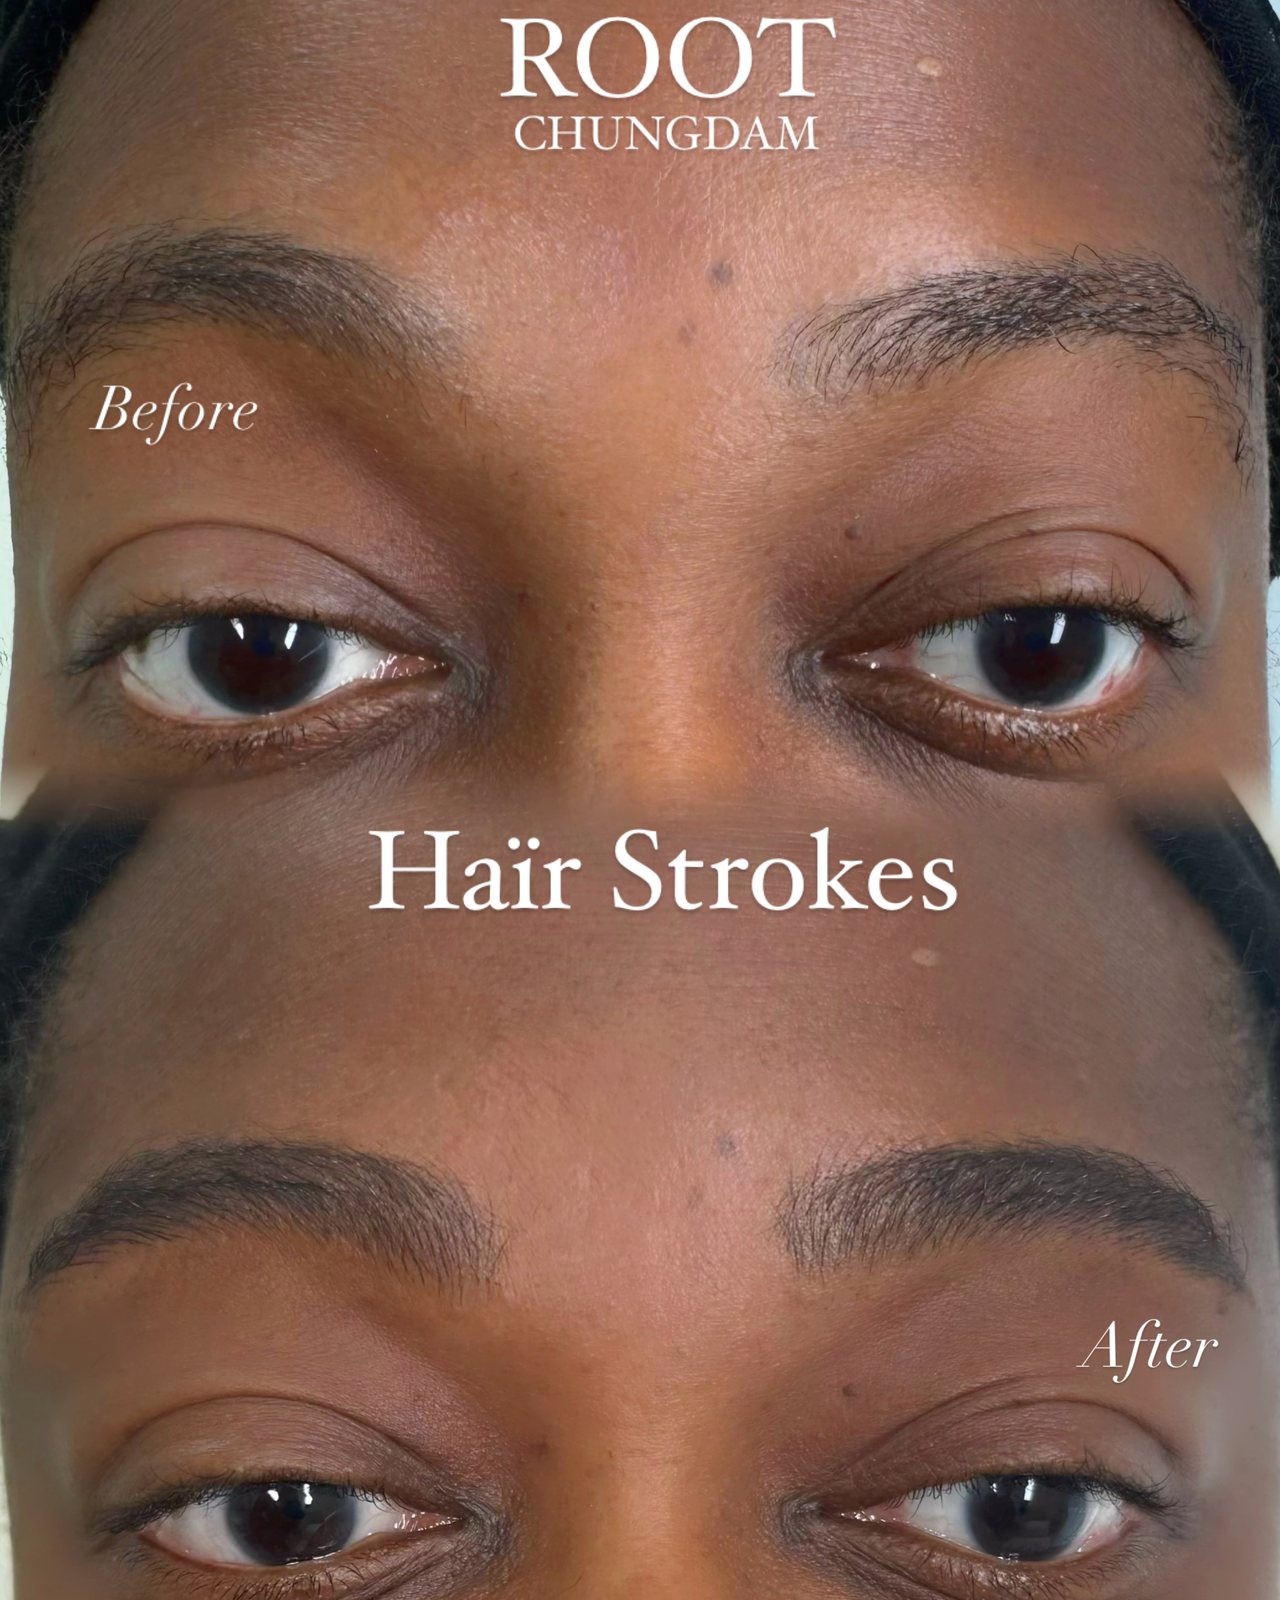
Published with the patient's consent as supplied by Root Chungdam.
Root Chungdam brows
Haïr Strokes by Root Chungdam, case 2
Hair-stroke brow work by Root Chungdam. Original labels supplied by Root Chungdam; photo interval and healing stage not provided. Results vary.
Artist portfolio reference. Individual results vary.
View Details
- Timeframe
- Not stated
- Technique
- Hair strokes (permanent makeup)
- Safety & disclosure
- Redness and flaking in the first days; colour settles over weeks. Results are not guaranteed and vary by individual.
Individual results may vary.
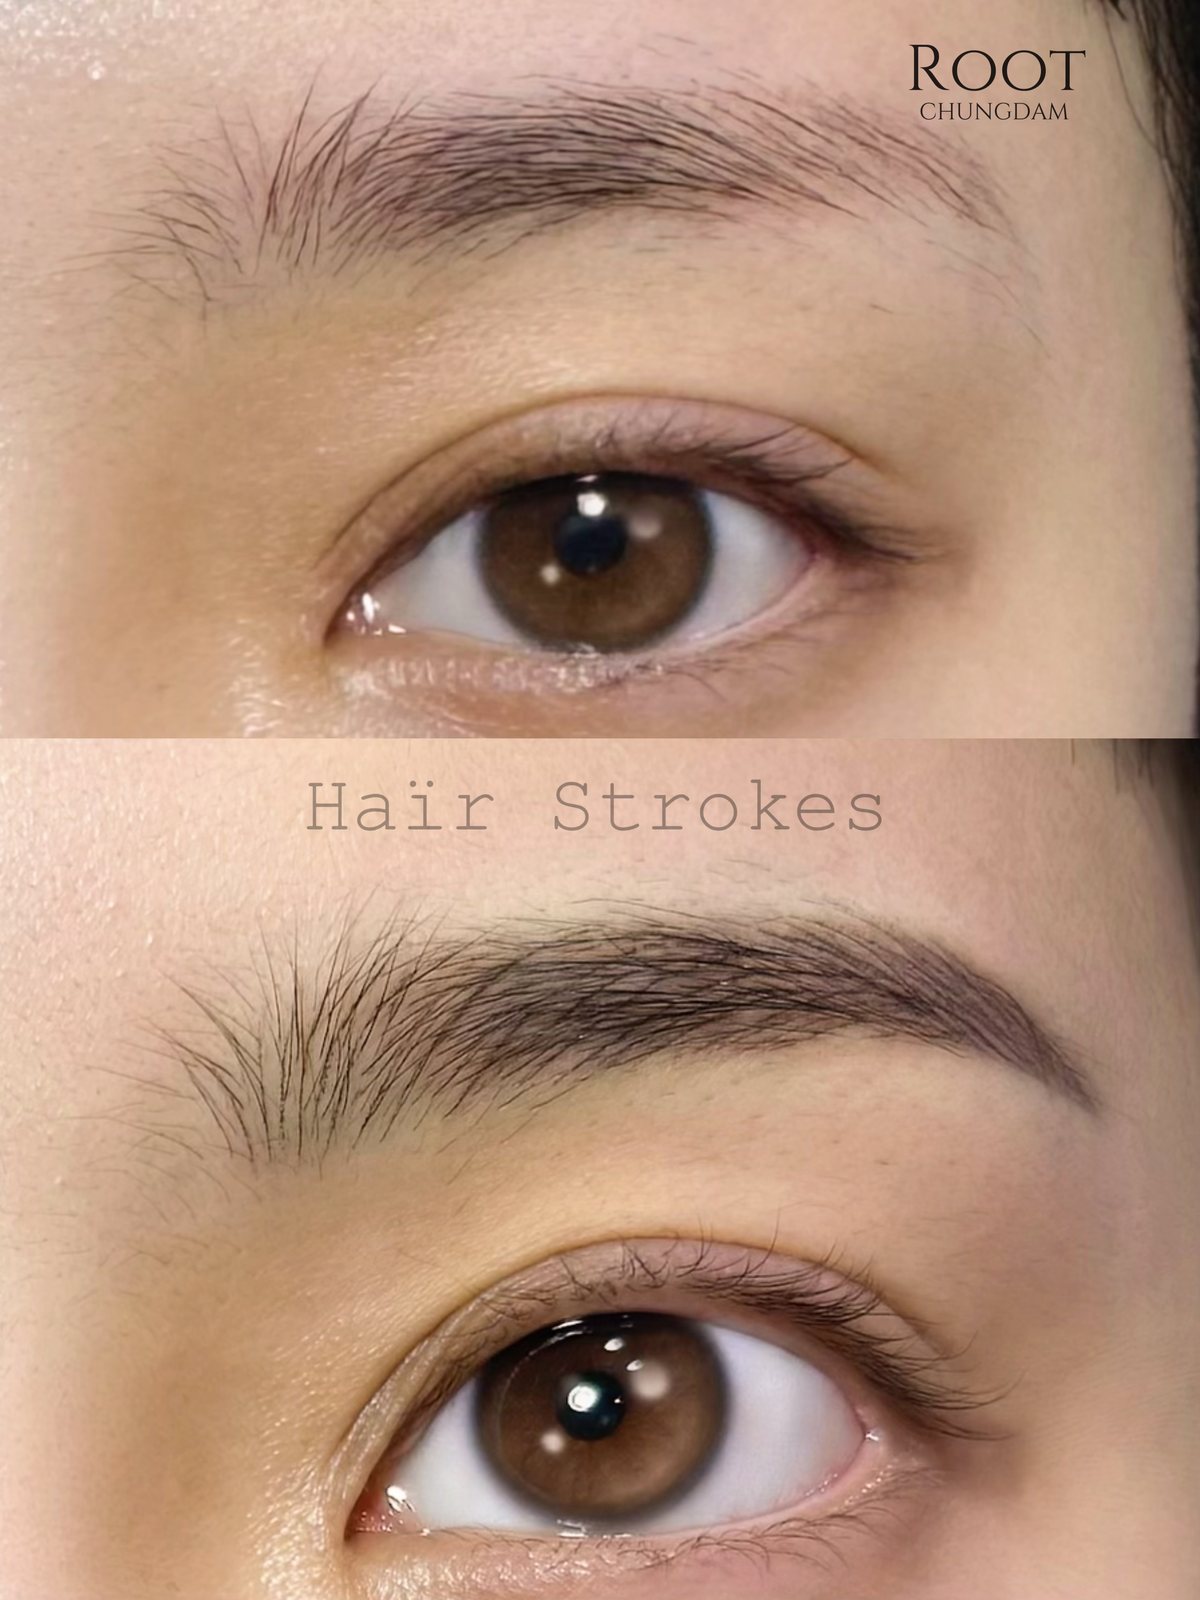
Published with the patient's consent as supplied by Root Chungdam.
Root Chungdam brows
Haïr Strokes by Root Chungdam, case 3
Hair-stroke brow work by Root Chungdam. Original labels supplied by Root Chungdam; photo interval and healing stage not provided. Results vary.
Artist portfolio reference. Individual results vary.
View Details
- Timeframe
- Not stated
- Technique
- Hair strokes (permanent makeup)
- Safety & disclosure
- Redness and flaking in the first days; colour settles over weeks. Results are not guaranteed and vary by individual.
Individual results may vary.
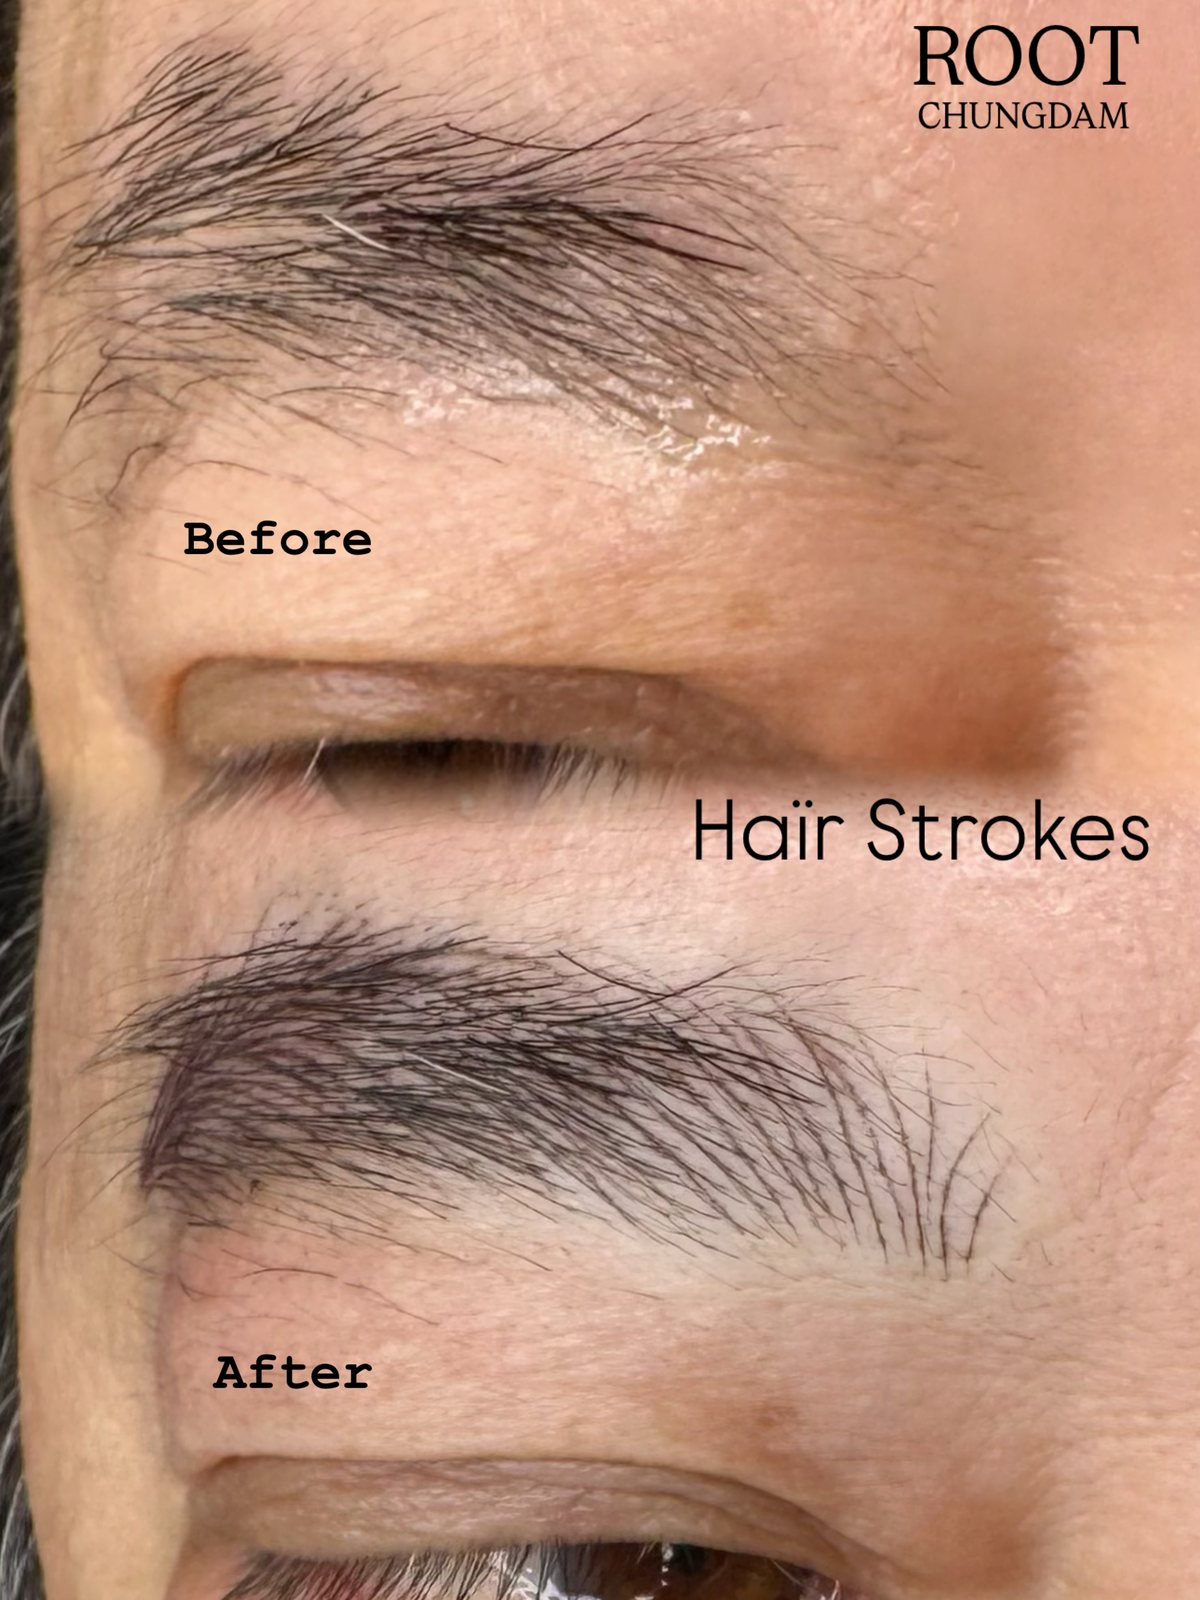
Published with the patient's consent as supplied by Root Chungdam.
Root Chungdam brows
Haïr Strokes by Root Chungdam, case 4
Hair-stroke brow work by Root Chungdam. Original labels supplied by Root Chungdam; photo interval and healing stage not provided. Results vary.
Artist portfolio reference. Individual results vary.
View Details
- Timeframe
- Not stated
- Technique
- Hair strokes (permanent makeup)
- Safety & disclosure
- Redness and flaking in the first days; colour settles over weeks. Results are not guaranteed and vary by individual.
Individual results may vary.
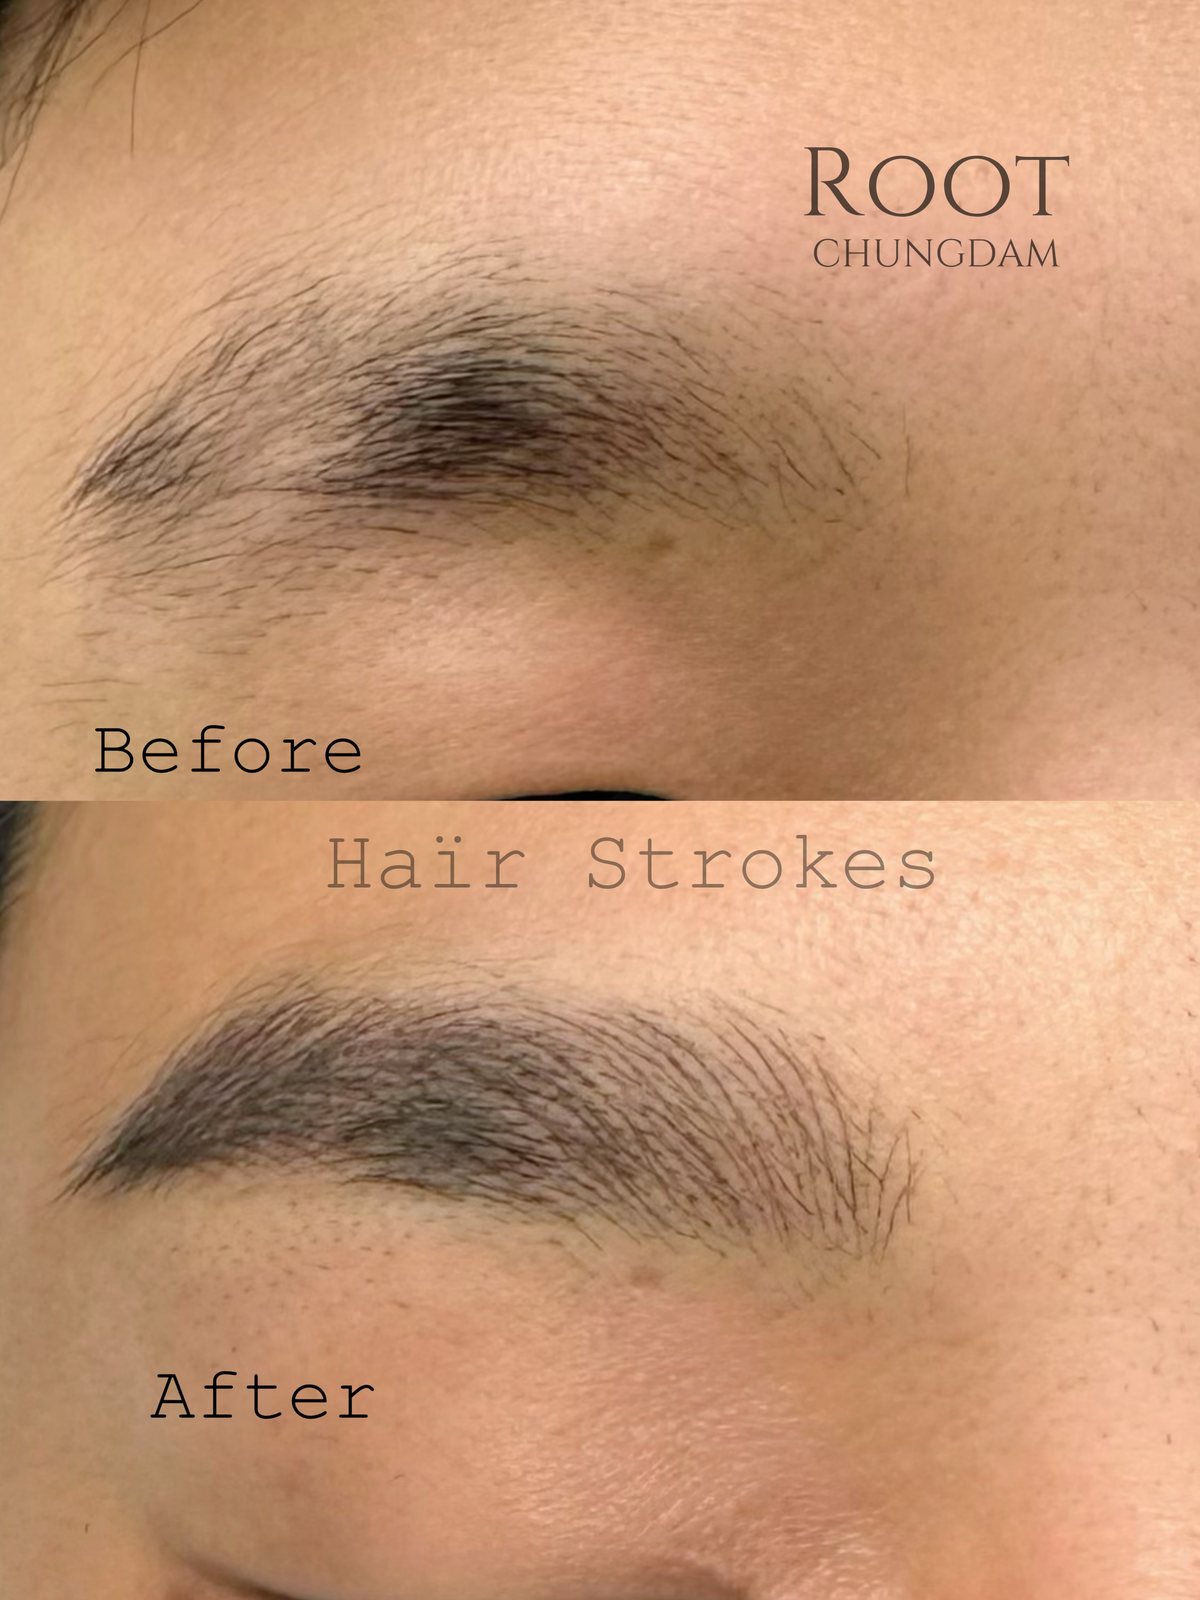
Published with the patient's consent as supplied by Root Chungdam.
Root Chungdam brows
Haïr Strokes by Root Chungdam, case 5
Hair-stroke brow work by Root Chungdam. Original labels supplied by Root Chungdam; photo interval and healing stage not provided. Results vary.
Artist portfolio reference. Individual results vary.
View Details
- Timeframe
- Not stated
- Technique
- Hair strokes (permanent makeup)
- Safety & disclosure
- Redness and flaking in the first days; colour settles over weeks. Results are not guaranteed and vary by individual.
Individual results may vary.
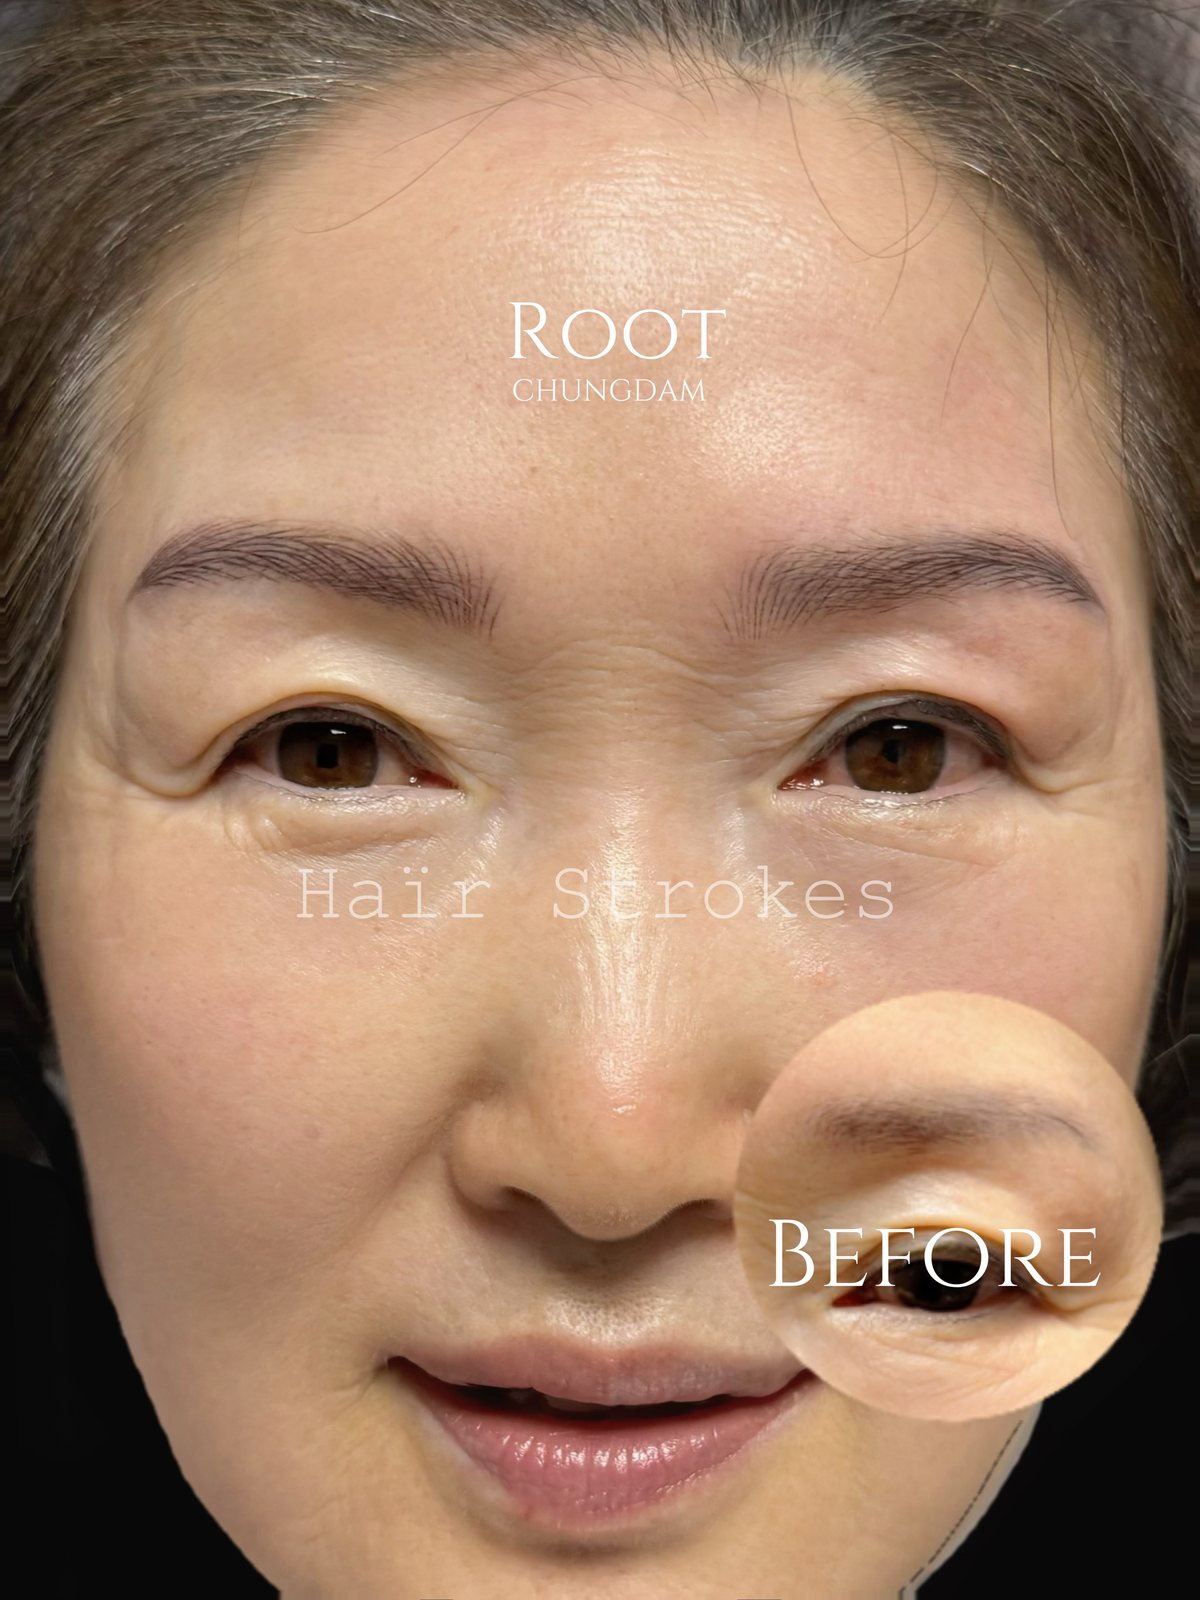
Published with the patient's consent as supplied by Root Chungdam.
Root Chungdam brows
Haïr Strokes by Root Chungdam, case 6
Hair-stroke brow work by Root Chungdam. Original labels supplied by Root Chungdam; photo interval and healing stage not provided. Results vary.
Artist portfolio reference. Individual results vary.
View Details
- Timeframe
- Not stated
- Technique
- Hair strokes (permanent makeup)
- Safety & disclosure
- Redness and flaking in the first days; colour settles over weeks. Results are not guaranteed and vary by individual.
Individual results may vary.
Show all 13 cases
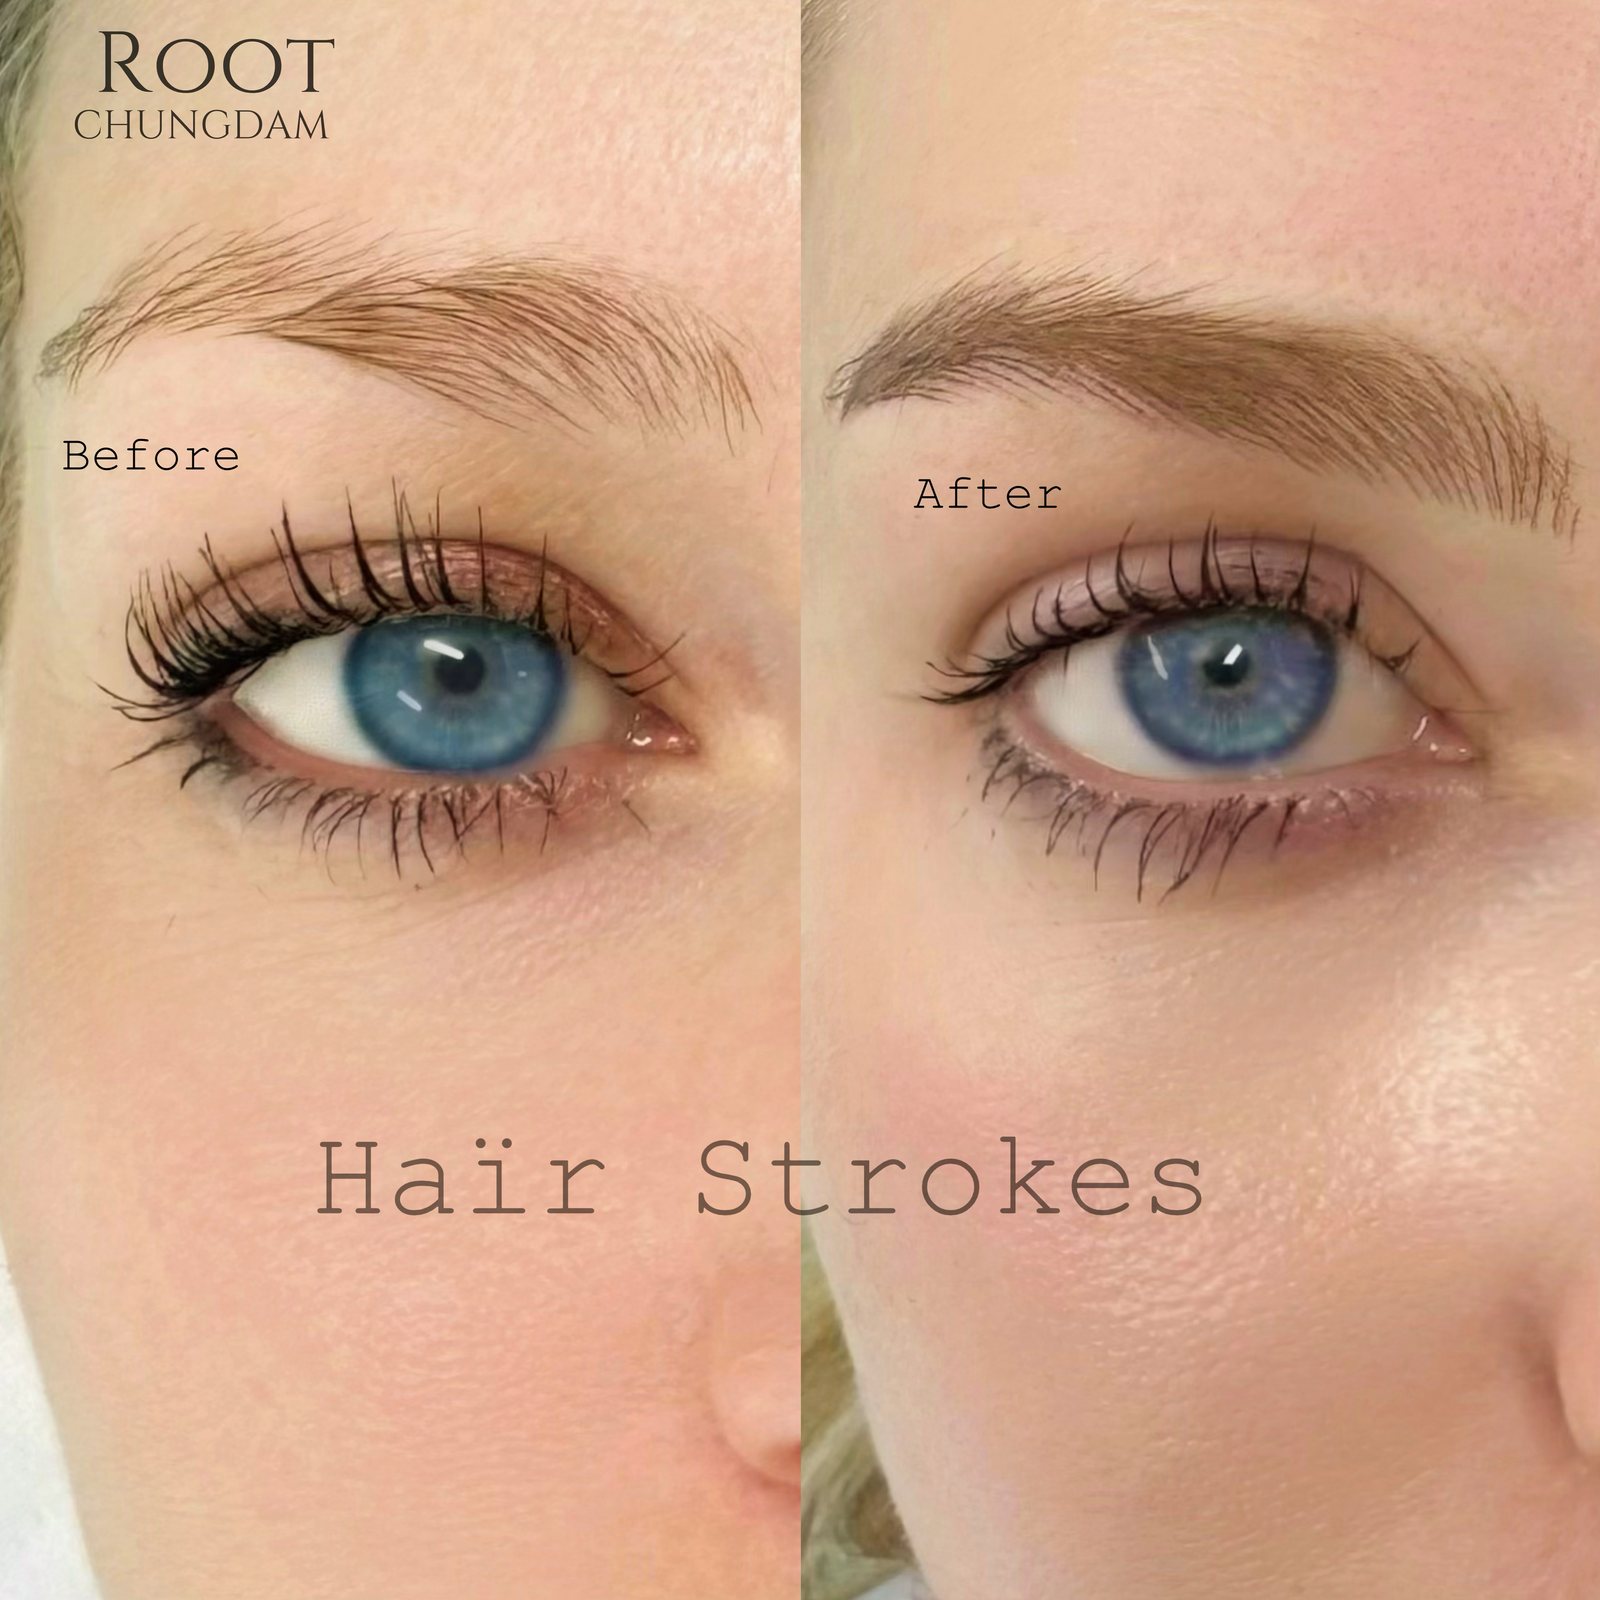
Published with the patient's consent as supplied by Root Chungdam.
Root Chungdam brows
Haïr Strokes by Root Chungdam, case 7
Hair-stroke brow work by Root Chungdam. Original labels supplied by Root Chungdam; photo interval and healing stage not provided. Results vary.
Artist portfolio reference. Individual results vary.
View Details
- Timeframe
- Not stated
- Technique
- Hair strokes (permanent makeup)
- Safety & disclosure
- Redness and flaking in the first days; colour settles over weeks. Results are not guaranteed and vary by individual.
Individual results may vary.
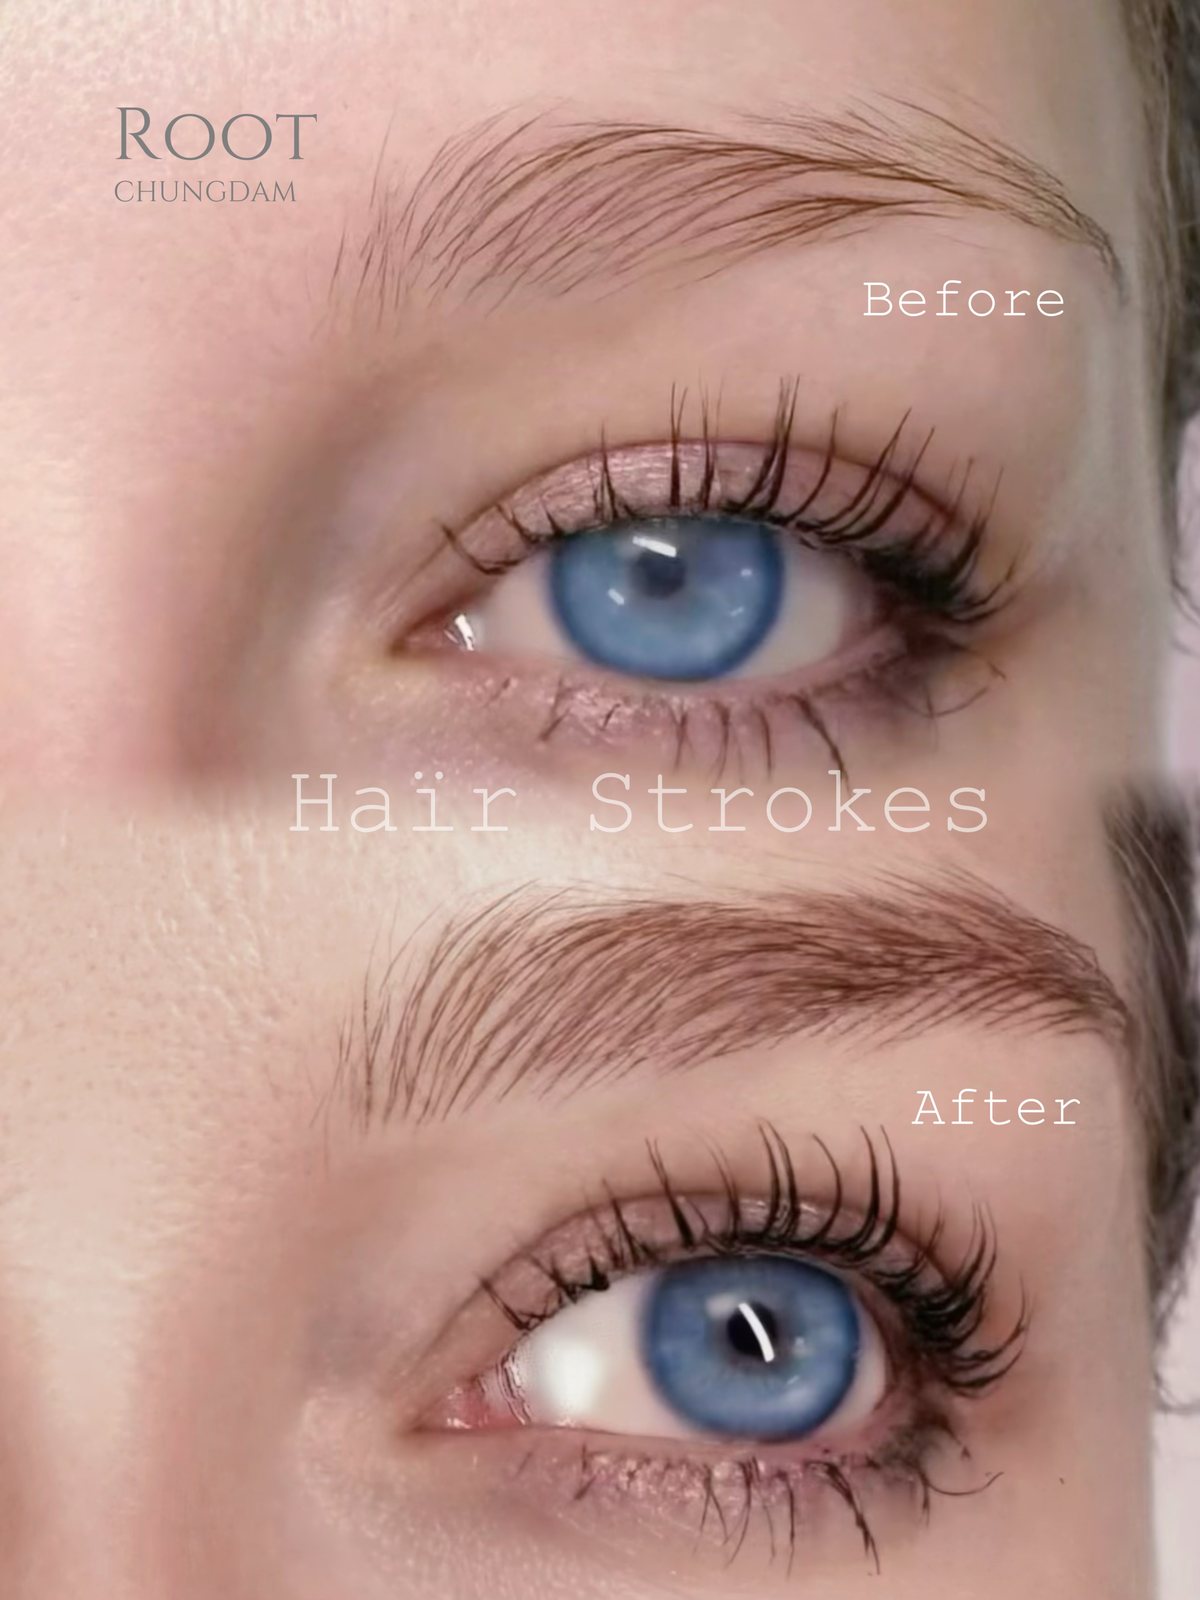
Published with the patient's consent as supplied by Root Chungdam.
Root Chungdam brows
Haïr Strokes by Root Chungdam, case 8
Hair-stroke brow work by Root Chungdam. Original labels supplied by Root Chungdam; photo interval and healing stage not provided. Results vary.
Artist portfolio reference. Individual results vary.
View Details
- Timeframe
- Not stated
- Technique
- Hair strokes (permanent makeup)
- Safety & disclosure
- Redness and flaking in the first days; colour settles over weeks. Results are not guaranteed and vary by individual.
Individual results may vary.
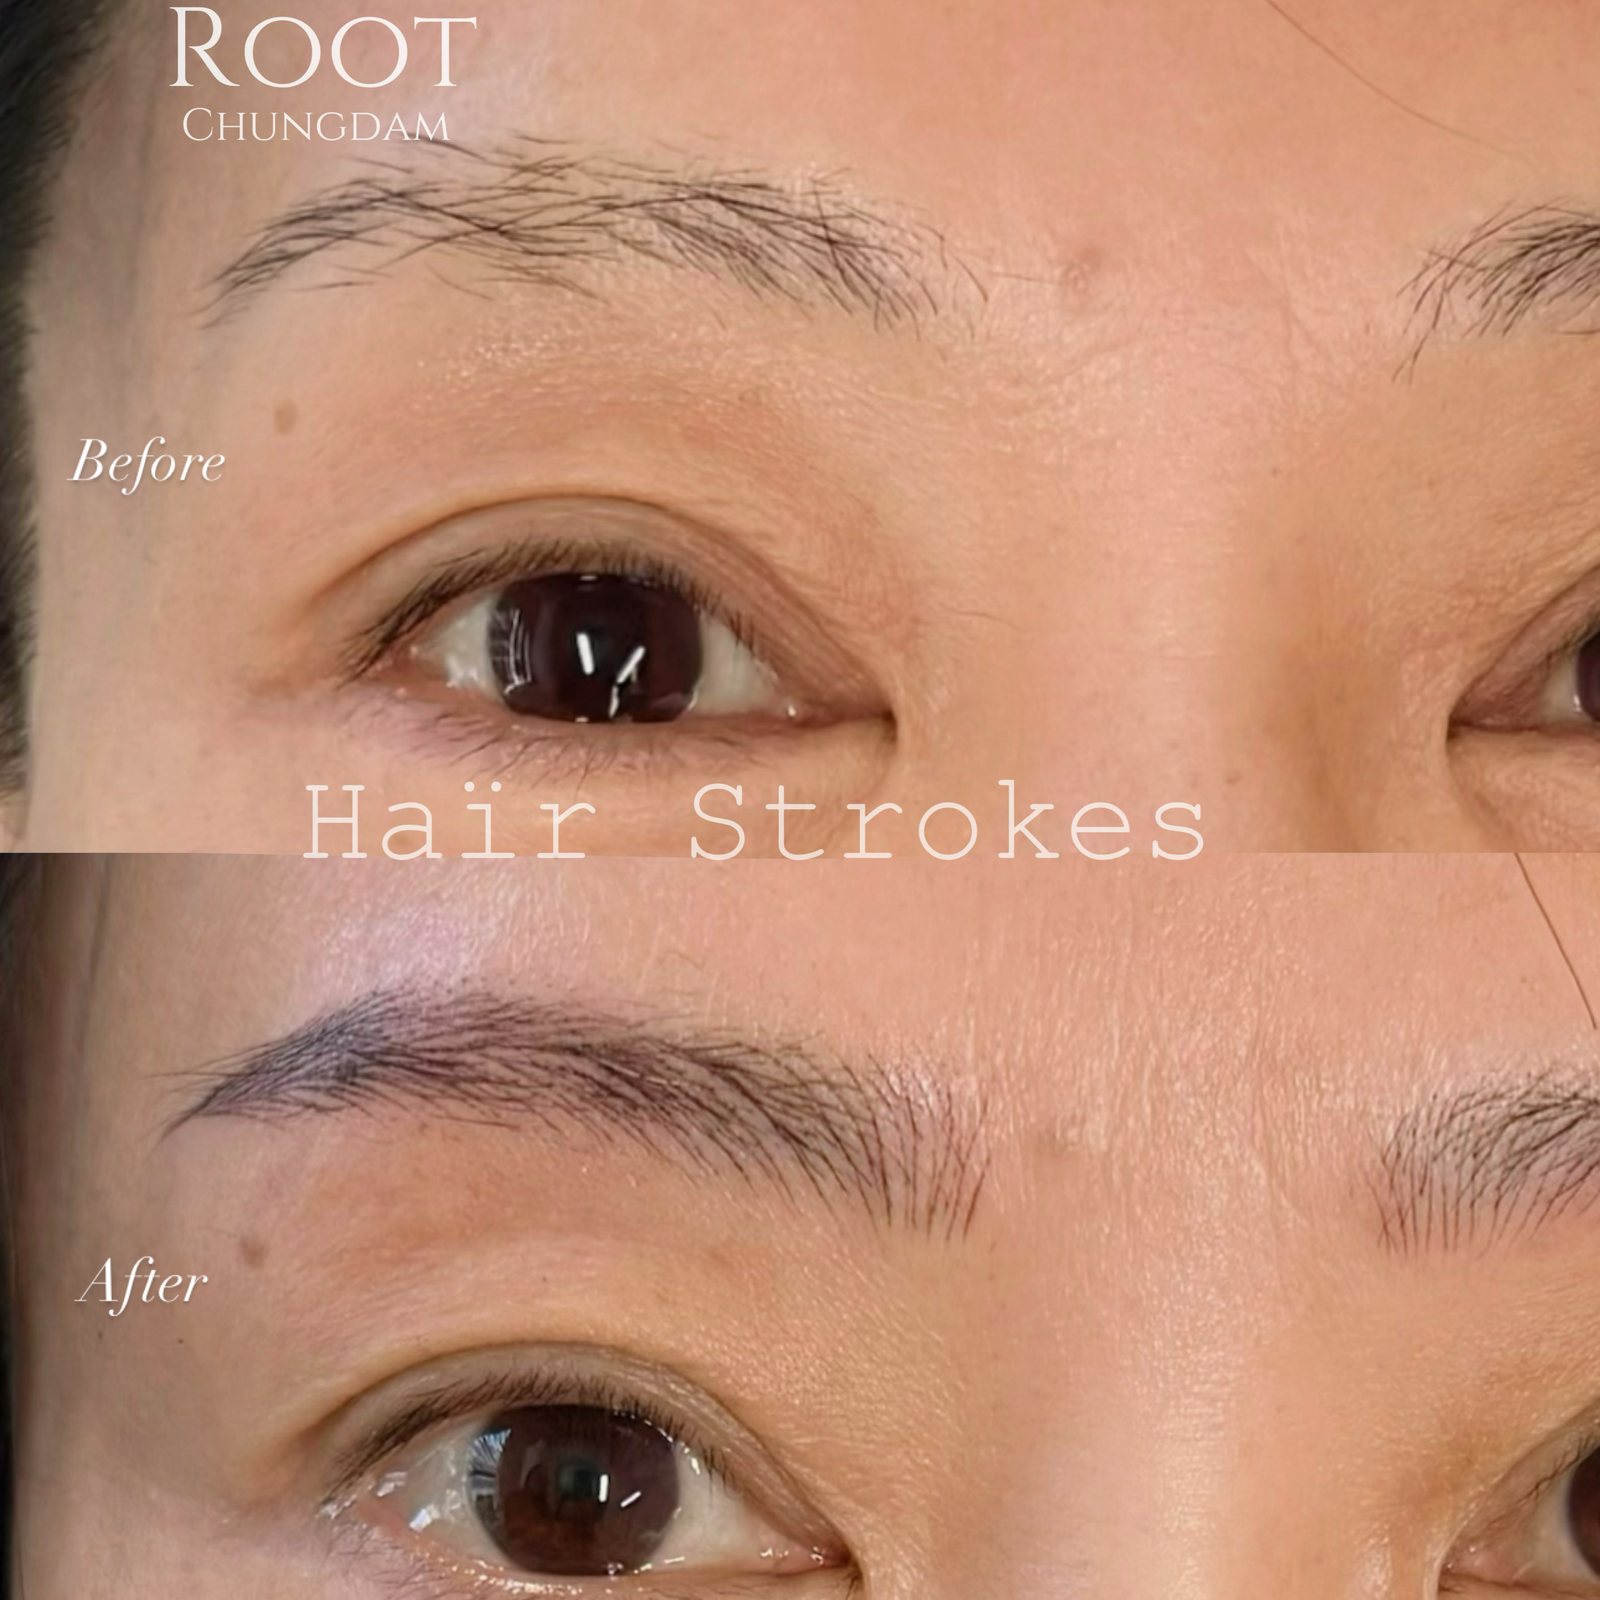
Published with the patient's consent as supplied by Root Chungdam.
Root Chungdam brows
Haïr Strokes by Root Chungdam, case 9
Hair-stroke brow work by Root Chungdam. Original labels supplied by Root Chungdam; photo interval and healing stage not provided. Results vary.
Artist portfolio reference. Individual results vary.
View Details
- Timeframe
- Not stated
- Technique
- Hair strokes (permanent makeup)
- Safety & disclosure
- Redness and flaking in the first days; colour settles over weeks. Results are not guaranteed and vary by individual.
Individual results may vary.
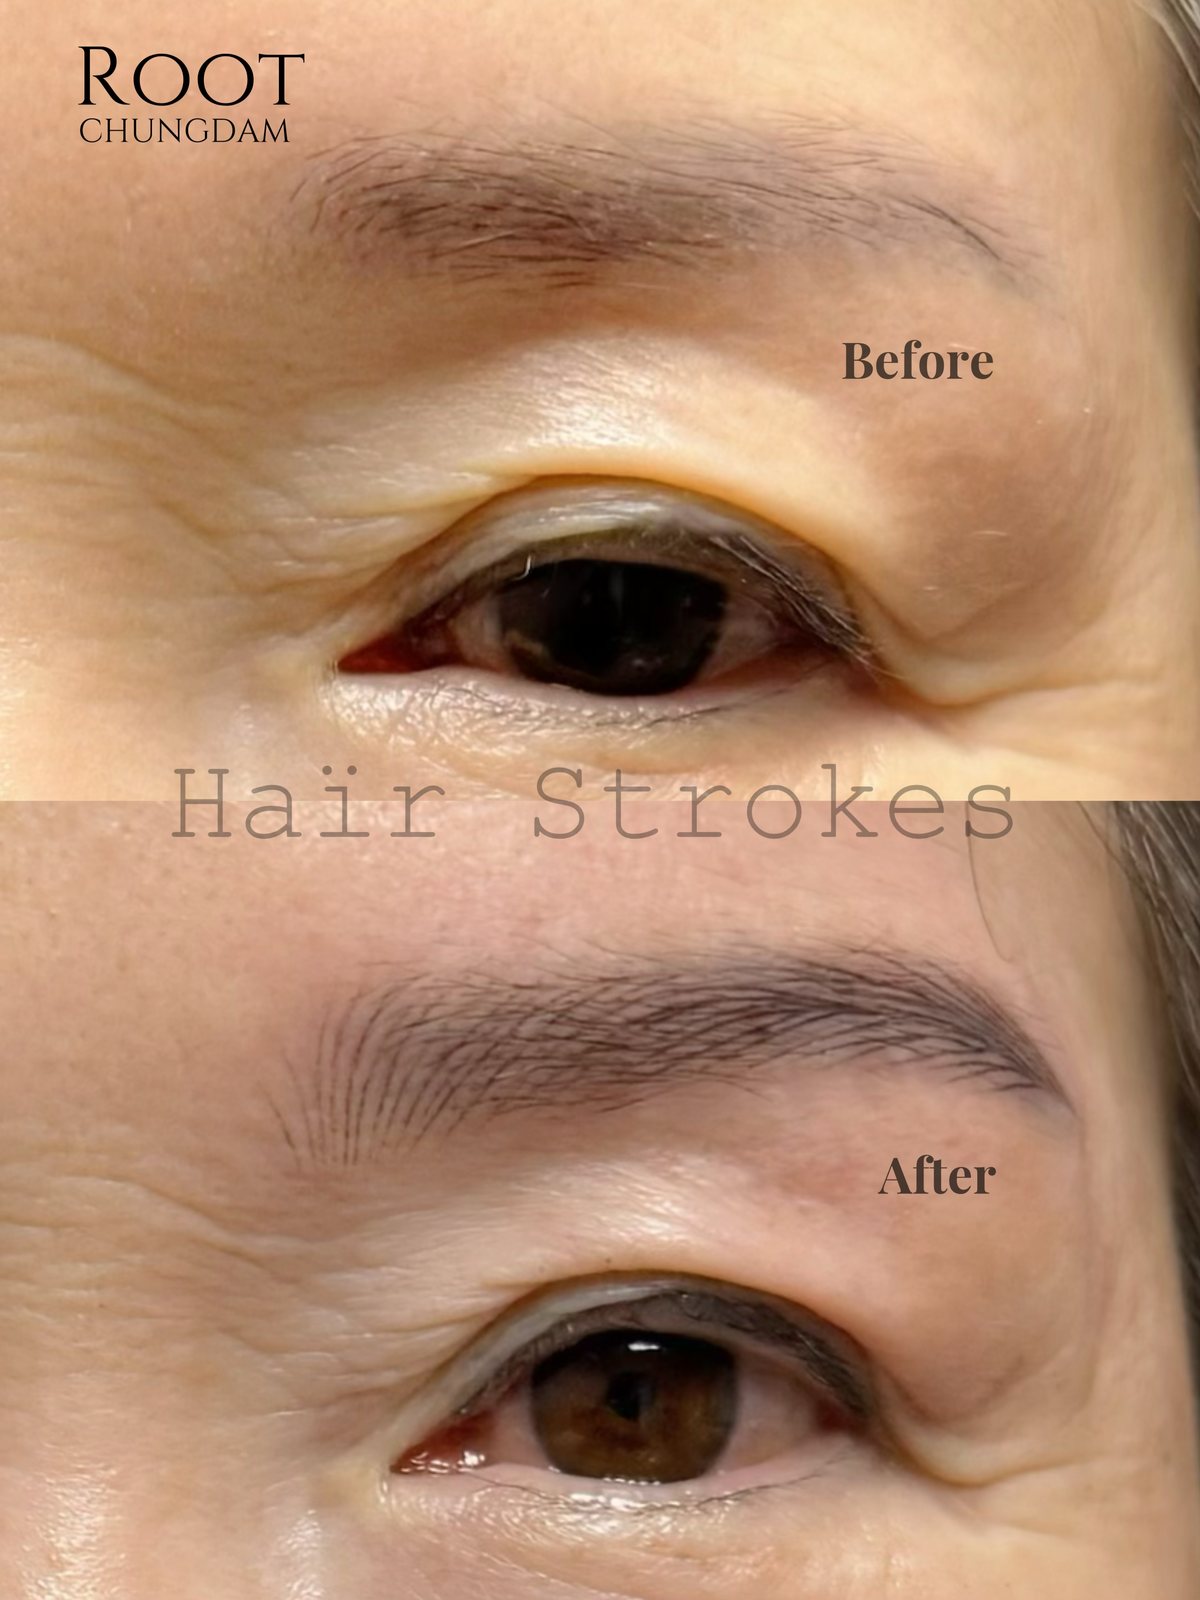
Published with the patient's consent as supplied by Root Chungdam.
Root Chungdam brows
Haïr Strokes by Root Chungdam, case 10
Hair-stroke brow work by Root Chungdam. Original labels supplied by Root Chungdam; photo interval and healing stage not provided. Results vary.
Artist portfolio reference. Individual results vary.
View Details
- Timeframe
- Not stated
- Technique
- Hair strokes (permanent makeup)
- Safety & disclosure
- Redness and flaking in the first days; colour settles over weeks. Results are not guaranteed and vary by individual.
Individual results may vary.
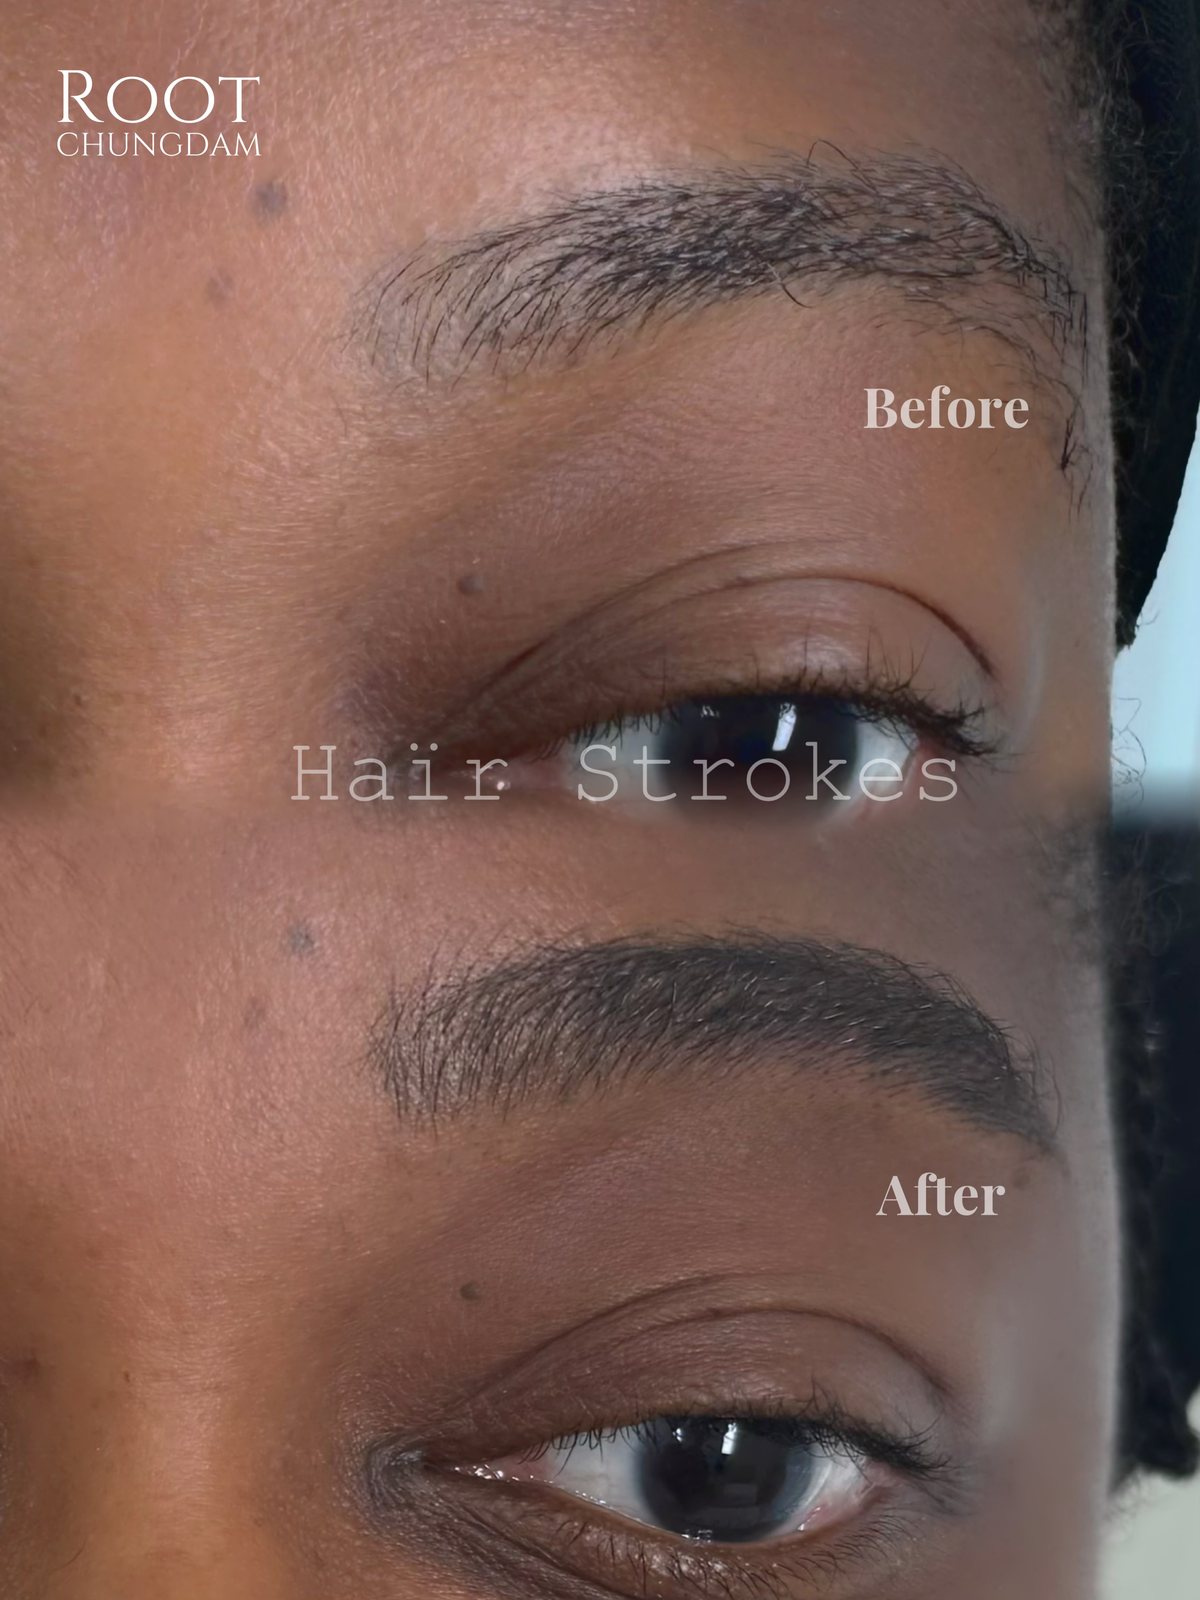
Published with the patient's consent as supplied by Root Chungdam.
Root Chungdam brows
Haïr Strokes by Root Chungdam, case 11
Hair-stroke brow work by Root Chungdam. Original labels supplied by Root Chungdam; photo interval and healing stage not provided. Results vary.
Artist portfolio reference. Individual results vary.
View Details
- Timeframe
- Not stated
- Technique
- Hair strokes (permanent makeup)
- Safety & disclosure
- Redness and flaking in the first days; colour settles over weeks. Results are not guaranteed and vary by individual.
Individual results may vary.
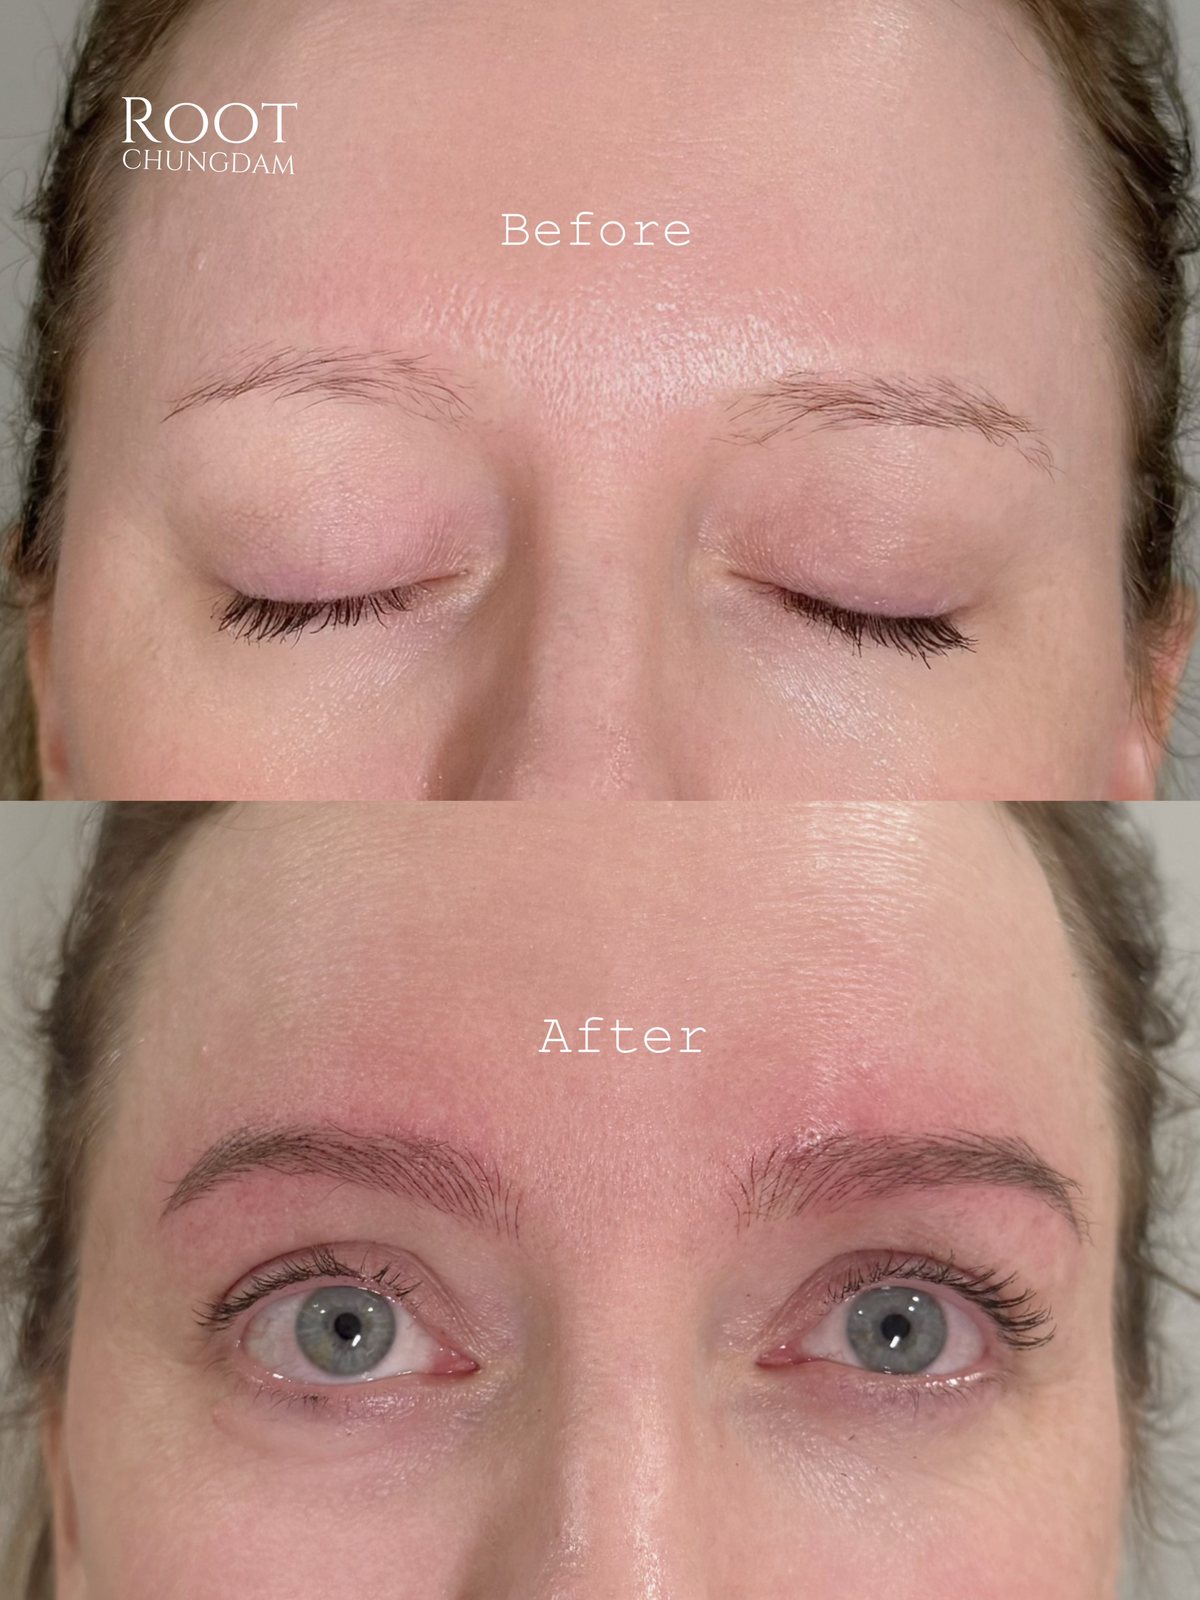
Published with the patient's consent as supplied by Root Chungdam.
Root Chungdam brows
Haïr Strokes by Root Chungdam, case 12
Hair-stroke brow work by Root Chungdam. Original labels supplied by Root Chungdam; photo interval and healing stage not provided. Results vary.
Artist portfolio reference. Individual results vary.
View Details
- Timeframe
- Not stated
- Technique
- Hair strokes (permanent makeup)
- Safety & disclosure
- Redness and flaking in the first days; colour settles over weeks. Results are not guaranteed and vary by individual.
Individual results may vary.
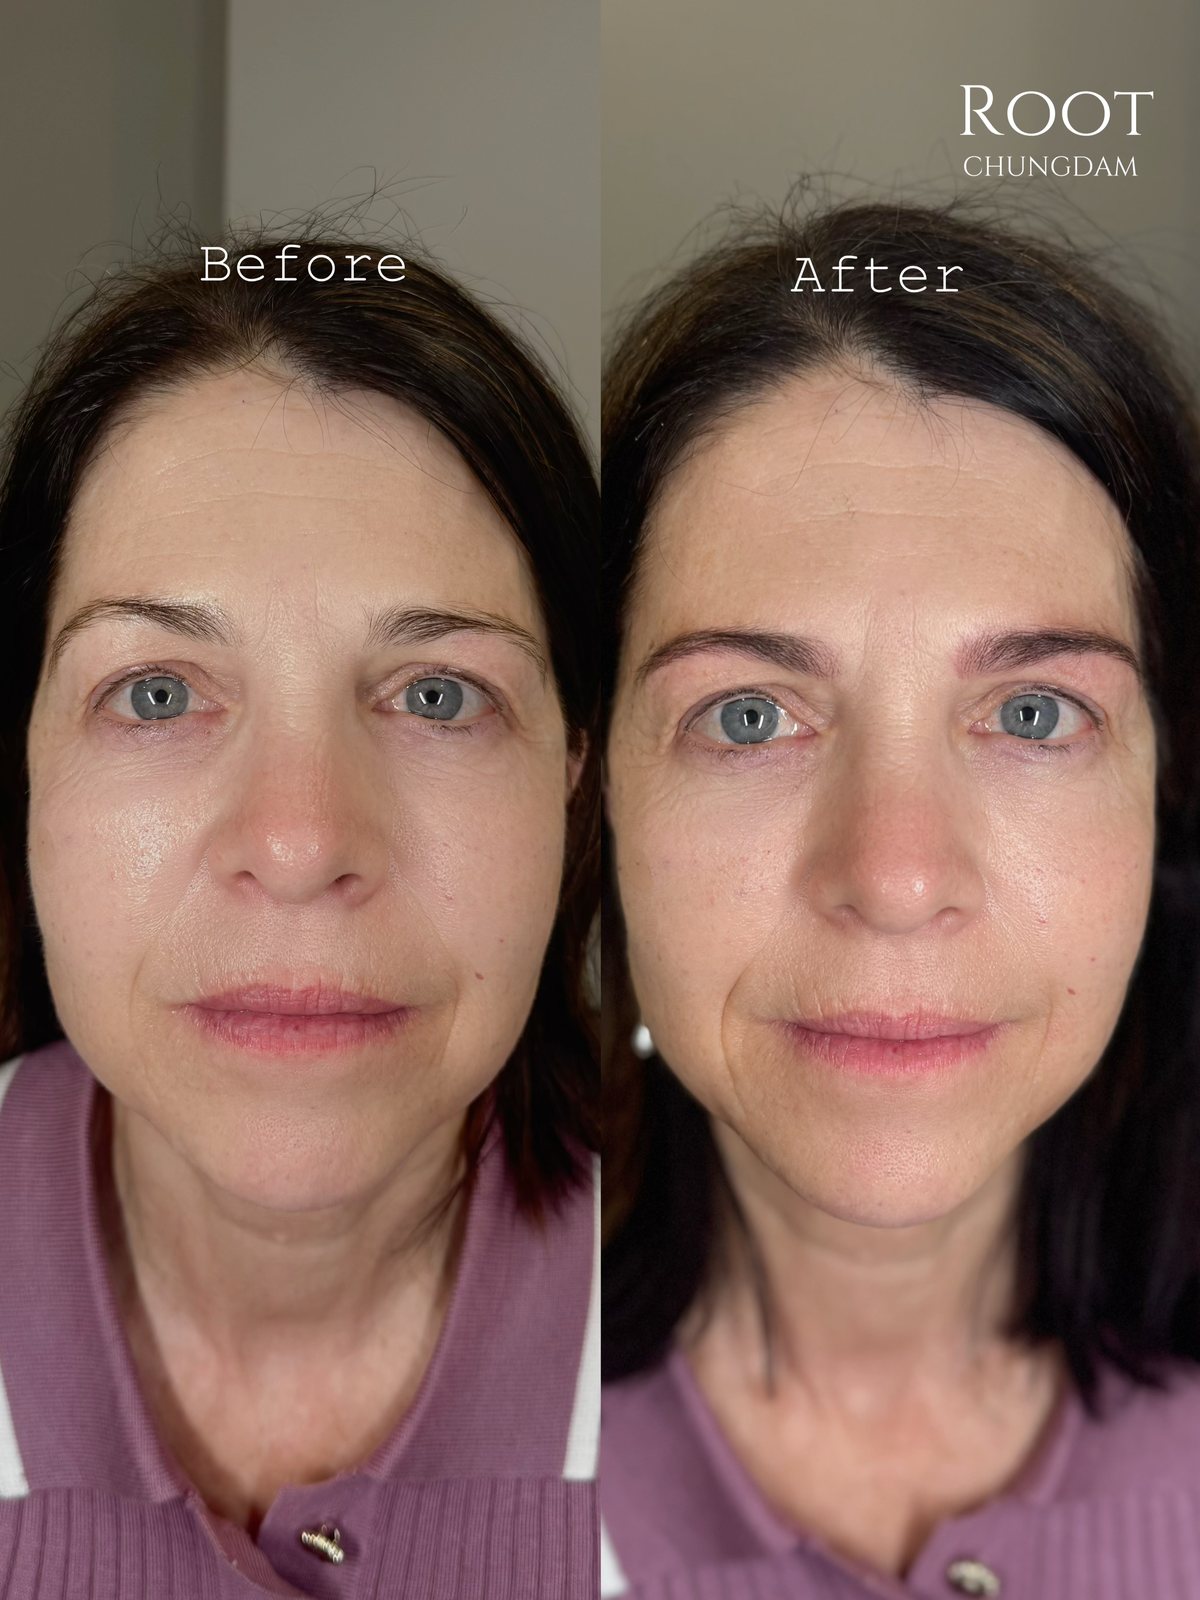
Published with the patient's consent as supplied by Root Chungdam.
Root Chungdam brows
Haïr Strokes by Root Chungdam, case 13
Hair-stroke brow work by Root Chungdam. Original labels supplied by Root Chungdam; photo interval and healing stage not provided. Results vary.
Artist portfolio reference. Individual results vary.
View Details
- Timeframe
- Not stated
- Technique
- Hair strokes (permanent makeup)
- Safety & disclosure
- Redness and flaking in the first days; colour settles over weeks. Results are not guaranteed and vary by individual.
Individual results may vary.